
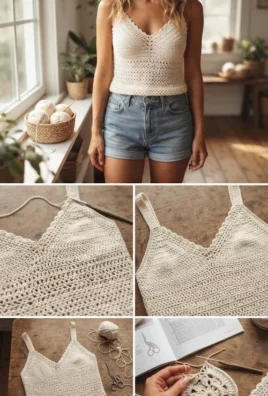
A handmade crochet tank top is a timeless summer wardrobe essential that effortlessly pairs comfort with breezy, bohemian style. Featuring structured molded bust cups, a delicate v-neckline, a breathable mesh midsection, a clean ribbed hem, and comfortable shoulder straps, this minimalist cream camisole is as versatile as it is stunning.
Following your precise preferences, this pattern is completely text-based with zero images and zero tables, providing clear, descriptive, and structured instructions in English from start to finish.
1. Project Overview
All measurements and times are approximate:
- Skill level: Intermediate
- Completion time: 5 to 8 hours
- Finished size: Written for Small/Medium (Bust size 32 to 36 inches), with clear stitch-count modifications for larger or smaller sizes
- Construction: Worked starting from the two individual molded bust cups downward to the lower torso band in seamless rows, finished with a delicate scalloped edge and matching shoulder straps
- Main stitches: Magic ring, chain, slip stitch, single crochet, double crochet, mesh stitch (chain spaces), and scalloped shell trims
- Suggested uses: Summer festival wear, beach cover-ups, warm-weather layering under linen shirts, and thoughtful handmade gifts
The final dimensions will depend on your yarn weight, hook size, and personal stitch tension.
2. Materials and Supplies
- Yarn: Soft, breathable 100% cotton or cotton-bamboo blend yarn in DK weight (Category 3) or light worsted weight (Category 4):
- Color: Natural Ecru, Cream, or Warm Sand (approx. 250 to 300 g)
- Crochet hook: 3.5 mm (US E/4) or 4.0 mm (US G/6) to maintain a dense, completely opaque fabric for the cups while keeping the torso light
- Tapestry needle: Blunt-ended yarn needle for weaving in tails and seaming
- Stitch marker: Helpful for tracking cup peaks and joining rows
- Scissors & measuring tape: For clean cuts and accurate sizing
3. US Crochet Abbreviations & Stitch Meanings
- ch: Chain stitch
- sl st: Slip stitch
- sc: Single crochet
- hdc: Half double crochet
- dc: Double crochet
- st(s): Stitch or stitches
- sp: Space
- ch-sp: Chain space
- FO: Fasten off
Special Technique: Cup Peak Shaping [2 dc, ch 1, 2 dc]
When working individual garment cups, working two double crochets, a chain, and two more double crochets into the very top turning chain or center space expands the cup outward and upward simultaneously, forming a natural 3D contour over the bust.
4. Skills to Know Before Starting
- Working Across Both Sides of a Foundation Chain: Starting a cup by working down one side of a chain, turning the apex, and working along the opposite unworked loops.
- Maintaining Firm Tension: Cotton yarn has minimal elasticity, so consistent tension ensures the tank top holds its tailored shape.
- Creating Mesh Stithes: Alternating double crochets with chain-1 spaces to build a breathable fabric pattern along the lower torso.
5. Complete Step-by-Step Crochet Pattern
Part A: The Molded Bust Cups (Make 2 Alike)
- Foundation Chain: Ch 14 (for Small/Medium).
- Round 1: Starting in the 3rd chain from the hook, work 1 dc in each of the next 11 chains. In the final chain space, work
[2 dc, ch 1, 2 dc]to form the peak. Working down the opposite side of the foundation chain loops, work 1 dc in each of the next 11 chains [26 dc total, 1 ch-1 peak space]. Ch 2, turn. - Round 2: Work 1 dc in each st up the side to the peak space (13 dc). In the peak
ch-1space, work[2 dc, ch 1, 2 dc]. Work 1 dc in each st down the opposite side (13 dc) [30 dc total]. Ch 2, turn. - Rounds 3–5 (3 rounds): Repeat Round 2, working 1 dc in each st along the sides and
[2 dc, ch 1, 2 dc]into the peak space. Do not fasten off the second cup; you will join them directly on the next step.
Part B: Joining Cups and Working the Torso
- Row 1 (Joining Row): Lay both cups side by side. Attach yarn at the outer bottom corner of the right cup, work dc evenly across the bottom edge of the right cup, chain 2 across the center gap, and continue working dc evenly across the bottom edge of the left cup. Ch 2, turn.
- Rows 2–6 (Solid Double Crochet Band): Work 1 dc in each stitch and chain space across. Ch 2, turn. This forms a solid supportive band beneath the bust.
- Rows 7–20 (Breathable Mesh Torso):
- Row 7:
*1 dc, ch 1, skip 1 st; repeat from *across the row. Ch 2, turn. - Rows 8–20: Work
[1 dc in the ch-1 space of the previous row, ch 1, skip the dc]across. Ch 2, turn. This creates the light, textured mesh midsection.
- Row 7:
- Rows 21–24 (Bottom Hem Band): Work 4 rows of solid half double crochet (
hdc) across to create a clean, finished lower hem. Fasten off and weave in tails.
Part C: Neckline Trim and Shoulder Straps
- Scalloped Neckline Trim: Reattach yarn at the outer bottom corner of the bust cups. Work a delicate shell border
[skip 1 st, 5 dc in next st, skip 1 st, sl st in next st]up the outer edge, across the v-neckline peaks, and down the inner edges. Fasten off. - Shoulder Straps (Make 2):
- Attach yarn to the apex peak of a cup. Chain 60 to 70 stitches (approx. 14 to 16 inches long).
- Starting in 2nd ch from hook, work 1 slip stitch or 1 half double crochet back down the chain.
- Fasten off, leaving a sewing tail, and stitch the strap securely to the upper back edge of the tank top. Repeat for the second strap.
6. Construction and Reference Specifications
- Bust Cups: 2 tailored 3D triangular cups joined seamlessly at the center front.
- Torso Panel: Solid underbust band transitioning into a textured mesh stitch pattern and finished with a half-double crochet hem.
- Straps: Two custom-length shoulder straps anchored from front peaks to the back panel.
- Edges: Scalloped shell edging outlining the upper v-neckline.
7. Color and Styling Variations
- Classic Minimalist Cream: Solid natural ecru or unbleached cotton for an effortless vintage aesthetic.
- Summer Sunset: Warm terracotta, mustard yellow, or dusty rose.
- Coastal Blue: Crisp white, sky blue, or navy blue cotton.
8. Assembly and Finishing Touches
- Blocking the Garment: Pin the finished tank top flat on a blocking mat and apply gentle steam to relax the cotton fibers and define the scalloped edges.
- Weaving Tails: Secure all color and joining tails along the wrong side of dense double crochet posts using your tapestry needle.
9. Troubleshooting Common Problems
- The cups flare or curl: Ensure you work
[2 dc, ch 1, 2 dc]into the peak space on every cup round to maintain proper 3D shaping. - The torso feels too loose: Switch down half a hook size for the mesh torso rows to keep the fabric fitted and supportive.
10. Frequently Asked Questions
1. Is cotton yarn required for this tank top?
100% cotton or cotton-bamboo blends are strongly recommended because they breathe well in warm weather and hold their shape without stretching out.
2. Can I adjust the length of the tank top?
Yes. Simply work extra rows in the mesh section before adding the bottom hem band if you prefer a longer tunic style instead of a cropped camisole.
Leave a Comment