
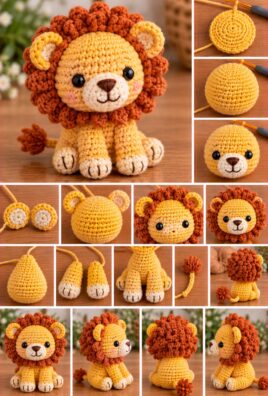
Crochet a tiny lion with a rounded golden head, a fluffy-looking mane, little paws, and a sweet embroidered face. This miniature amigurumi project makes a lovely handmade decoration, collectible, or thoughtful gift for an animal lover.
In this beginner-friendly tutorial, you’ll learn how to crochet each part, shape the mane, embroider the lion’s expression, and assemble the finished toy. The pattern uses US crochet terminology and continuous spiral rounds for most three-dimensional pieces.
1. Project Overview
- Difficulty: Beginner to advanced beginner
- Approximate finished size: 4–5 inches tall and about 3–4 inches wide, depending on yarn, hook, and tension
- Approximate completion time: 4–7 hours
- Construction: Separate head, body, muzzle, mane, ears, four legs, and tail, sewn together
- Main techniques: Magic ring, single crochet, increases, invisible decreases, spiral rounds, stuffing, embroidery, and sewing
- Recommended assembly order: Crochet all pieces, attach the mane and muzzle, embroider the face, add the ears, join the head and body, sew on the legs and tail, then finish the seams.
The lion is designed to sit with its four short legs supporting the body. For a child-oriented toy, use embroidered facial details and avoid detachable small parts.
2. Materials and Tools
- Main yarn: Approximately 25–35 g of golden yellow, tan, or warm yellow yarn for the head and body
- Mane yarn: Approximately 20–30 g of rust, orange, caramel, or brown yarn
- Muzzle yarn: A small amount of cream, beige, or light tan yarn
- Paw details: A small amount of darker brown or matching golden yarn, if desired
- Tail tuft yarn: A little of the mane color
- Crochet hook: Approximately 2.5–3 mm for lightweight yarn, or a suitable smaller hook for your chosen yarn
- Polyester fiberfill
- Yarn needle
- Stitch markers
- Scissors
- Optional embroidery yarn in dark brown or black
Choose a hook that produces a dense fabric. The stuffing should not be visible through the stitches. Thicker yarn and a larger hook usually produce a larger lion, while finer yarn and a smaller hook create a smaller one. Adjust the hook as needed to keep the fabric firm.
For a toy intended for a young child, embroidered eyes and facial details are preferable to safety eyes or glued-on decorations. Small detachable pieces can pose a choking risk, and no toy should be assumed safe for every age group without appropriate assessment.
3. US Crochet Abbreviations
| Abbreviation | Meaning |
|---|---|
| MR | Magic ring |
| ch | Chain |
| sc | Single crochet |
| sl st | Slip stitch |
| inc | Increase: work 2 sc in the same stitch |
| dec | Decrease: work 2 stitches together |
| st / sts | Stitch / stitches |
| rnd | Round |
| rep | Repeat |
| FLO | Front loop only |
| BLO | Back loop only |
Invisible decrease: Insert the hook into the front loop of the next stitch, then into the front loop of the following stitch. Yarn over and pull through both front loops, yarn over again, and pull through the remaining loops on the hook. This joins two stitches into one with less visible bulk.
Unless a section says otherwise, work in continuous spiral rounds without joining at the end of each round. Place a stitch marker in the first stitch of every round and move it up as you work.
A stitch count at the end of each round tells you how many stitches should remain after completing that round.
4. Gauge and Finished Size
A formal gauge swatch is usually less important for amigurumi than maintaining consistent, tight stitches. Before beginning, crochet a few single crochet rounds and check that the fabric is dense enough to keep the stuffing hidden.
The finished lion should be approximately 4–5 inches tall when made with lightweight yarn and a small hook. The exact size depends on your yarn, hook, tension, stuffing, and how the pieces are positioned.
Changing yarn weight affects more than height. It can also change the relative size of the head, mane, muzzle, legs, and tail. If you change materials, compare the pieces as you work so they remain proportionate.
5. Understanding the Lion’s Construction
The lion is built from separate pieces:
- Head: A rounded golden ball that forms the center of the face.
- Muzzle: A small, pale oval attached to the lower front of the head.
- Mane: A textured circular frame around the head.
- Ears: Two small, flattened semicircular pieces.
- Body: A compact, slightly oval shape.
- Legs: Four short, matching pieces sewn around the lower body.
- Tail: A narrow tube with a small tuft at the end.
- Face: Embroidered eyes, nose, mouth, and optional eyebrows.
The head and body are crocheted separately and sewn together. This makes it easier to position the mane and embroider the face before attaching the head to the body.
The mane is made as a circular cap with textured loops around its outer edge. The cap sits behind the face, framing the head while leaving the muzzle and eyes visible.
6. Complete Round-by-Round Crochet Pattern
A. Crochet the Head
Use golden yellow yarn. Work in continuous spiral rounds.
- Round 1: Make 6 sc in an MR. (6 sts)
- Round 2: Inc in each st around. (12 sts)
- Round 3: Rep (sc, inc) 6 times. (18 sts)
- Round 4: Rep (2 sc, inc) 6 times. (24 sts)
- Round 5: Rep (3 sc, inc) 6 times. (30 sts)
- Round 6: Rep (4 sc, inc) 6 times. (36 sts)
- Rounds 7–12: Sc in each st around. (36 sts per round)
- Round 13: Rep (4 sc, dec) 6 times. (30 sts)
- Round 14: Sc in each st around. (30 sts)
- Round 15: Rep (3 sc, dec) 6 times. (24 sts)
- Round 16: Rep (2 sc, dec) 6 times. (18 sts)
- Round 17: Rep (sc, dec) 6 times. (12 sts)
- Round 18: Dec 6 times. (6 sts)
Stuffing and closing: Begin adding fiberfill after Round 15, when the opening is still large enough to work comfortably. Add small amounts and shape the head into a rounded ball. Keep the lower area slightly less firm so it can be sewn neatly to the body.
After Round 18, cut the yarn, leaving a long tail. Thread the tail through the remaining six front loops and pull gently to close the opening. Secure the yarn and weave in the end.
The head should be rounded rather than elongated. If it looks too tall, check your tension and the number of straight rounds before the decreases.
B. Crochet the Muzzle
Use cream or light tan yarn. The muzzle is worked in joined rows to create a small oval.
- Row 1: Ch 7. Sc in the second ch from the hook and in the next 5 ch. (6 sc)
- Row 2: Ch 1, turn. Inc in the first st, sc in the next 4 sts, inc in the last st. (8 sts)
- Row 3: Ch 1, turn. Sc across. (8 sts)
- Row 4: Ch 1, turn. Dec, sc in the next 4 sts, dec. (6 sts)
Fasten off, leaving a long sewing tail.
This creates a small, softly tapered oval. If your muzzle looks too narrow for your head, you can add one additional row of 8 sc before the final decrease row, but keep the added row consistent with the shape you want.
Positioning the muzzle:
- Place the head with the closed end at the top and the opening at the bottom.
- Center the muzzle on the lower front, below the intended eye line.
- Pin or hold it in place and check that the same amount of head is visible on both sides.
- Sew around the edge using the long tail, taking small stitches through the muzzle and the head.
- Before closing the seam completely, check that the muzzle lies flat and does not cover the eye positions.
Embroidering the nose and mouth: Use dark brown or black yarn. Make a small horizontal or triangular nose near the upper center of the muzzle. Bring the yarn down from the nose to create a short vertical line, then add two small curved or angled stitches to form a simple mouth. Secure the ends inside the head.
C. Crochet the Mane
Use rust, orange, caramel, or brown yarn. The mane is a circular cap with a textured outer edge.
Mane cap
- Round 1: Make 6 sc in an MR. (6 sts)
- Round 2: Inc in each st around. (12 sts)
- Round 3: Rep (sc, inc) 6 times. (18 sts)
- Round 4: Rep (2 sc, inc) 6 times. (24 sts)
- Round 5: Rep (3 sc, inc) 6 times. (30 sts)
- Round 6: Rep (4 sc, inc) 6 times. (36 sts)
- Rounds 7–9: Sc in each st around. (36 sts per round)
Fasten off and weave in the starting end. Leave a long tail on the final round if you prefer to sew the cap to the head with the same yarn.
The cap should be a shallow dome with a circular edge. It is designed to cover the back and sides of the head, not the face.
Textured mane edge
Rejoin the mane yarn at the edge of the cap. Work around the cap’s outer edge, making one textured loop in each of the 36 edge stitches.
For each loop:
- Insert the hook into the next edge stitch and make a sl st to secure the yarn.
- Ch 4.
- Sl st into the same edge stitch.
- Move to the next edge stitch and repeat.
Continue until all 36 edge stitches have a loop. Fasten off and weave in the end.
These short chain loops create a simple curly-looking mane. For a fuller appearance, make a second row of loops just inside the first row, spacing them between the existing loops. If adding a second row, distribute the loops evenly and avoid making the edge too tight.
Fitting the mane
Place the mane cap over the back of the head. Its edge should frame the head near the sides of the face, with the top of the cap centered over the crown. Keep the muzzle and intended eye area completely exposed.
Pin the cap at the top, bottom, and both sides. Check the front view and side view before sewing. Attach the cap with small, evenly spaced stitches around its edge, working through the mane cap and the head. Do not pull the stitches so tightly that the cap puckers or flattens the head.
If the cap is too small, check your tension and compare the head’s widest round with the mane’s edge. If it is too large, distribute the excess evenly rather than gathering it all in one spot.
D. Crochet the Ears
Make two matching ears using golden yellow yarn. Leave them unstuffed so they remain small and flat.
- Round 1: Make 6 sc in an MR. (6 sts)
- Round 2: Inc in each st around. (12 sts)
- Round 3: Sc in each st around. (12 sts)
Sl st into the next st and fasten off, leaving a long sewing tail.
Flatten each ear gently into a small cup or semicircle. If the opening is noticeable, thread the sewing tail through the stitches along the opening and draw it slightly closed, without pulling the piece completely shut.
Attaching the ears: Position one ear on each side of the head near the upper edge of the mane. The ears should sit slightly behind the front face area, with their upper edges visible above the mane. Pin both ears before sewing and compare their height and angle from the front. Sew each ear securely to the head and, where appropriate, to the mane cap.
E. Crochet the Body
Use golden yellow yarn. The body is a compact oval with a wider lower section and a narrower top for joining the head.
- Round 1: Make 6 sc in an MR. (6 sts)
- Round 2: Inc in each st around. (12 sts)
- Round 3: Rep (sc, inc) 6 times. (18 sts)
- Round 4: Rep (2 sc, inc) 6 times. (24 sts)
- Round 5: Rep (3 sc, inc) 6 times. (30 sts)
- Rounds 6–9: Sc in each st around. (30 sts per round)
- Round 10: Rep (3 sc, dec) 6 times. (24 sts)
- Round 11: Sc in each st around. (24 sts)
- Round 12: Rep (2 sc, dec) 6 times. (18 sts)
- Round 13: Rep (sc, dec) 6 times. (12 sts)
Fasten off, leaving a long sewing tail. Stuff the body through the 12-stitch opening. Begin with small amounts of fiberfill and add more until the body holds its shape without becoming rigid.
The 12-stitch opening at the top will be sewn to the bottom of the head. Keep the opening clear of stuffing so the seam can be made neatly. Do not close the opening separately.
For a seated lion, shape the bottom into a slightly flattened surface. The body should be firm enough to support the head but not so tightly stuffed that the stitches stretch.
F. Crochet the Four Legs
Use golden yellow yarn to make four matching legs. Each leg is a short, softly rounded tube that will be flattened slightly before sewing.
- Round 1: Make 6 sc in an MR. (6 sts)
- Round 2: Inc in each st around. (12 sts)
- Rounds 3–5: Sc in each st around. (12 sts per round)
Sl st into the next st and fasten off, leaving a long sewing tail.
Add a small amount of fiberfill to the rounded end of each leg. Leave the top section mostly unstuffed so it can be flattened and sewn to the body.
Flatten the top opening so the stitches align. Using the sewing tail, sew across the opening through both layers. This creates a flat attachment edge.
Attaching the legs:
- Place two front legs on the lower front of the body, spaced evenly on either side of the center.
- Place two back legs on the lower sides, slightly behind the front legs.
- Keep the bottom of each leg near the same level so the lion can sit evenly.
- Pin all four legs before sewing. Check the lion from the front and side to confirm that the legs are balanced.
- Sew each flattened top edge securely to the body with small stitches.
For a stable sitting pose, position the back legs slightly farther out to the sides than the front legs. The feet should touch the surface when the lion is placed upright.
G. Crochet the Tail
Use golden yellow yarn for the tail and mane-colored yarn for the tuft.
Tail tube
- Round 1: Make 6 sc in an MR. (6 sts)
- Rounds 2–9: Sc in each st around. (6 sts per round)
Fasten off, leaving a long sewing tail. The tail should be a narrow tube approximately 1.5–2 inches long, depending on your yarn and tension.
Add only a tiny amount of fiberfill if needed to help the tail hold its shape. Do not overstuff it. Flatten the open end slightly and sew across it to create a secure attachment edge.
Tail tuft
Use the mane yarn.
- Make 6 sc in an MR. (6 sts)
- Work 1 round of sc in each st around. (6 sts)
Fasten off, leaving a long tail. Add a tiny pinch of fiberfill only if needed, then draw the opening closed with the yarn tail.
Sew the tuft securely to the end of the tail. If you want a more textured tuft, add a few short chain loops around its outer edge using the same method as the mane.
Attaching the tail: Place the tail at the center back of the body, low enough to hang naturally behind the lion. Pin it in place and check that it does not pull the body backward. Sew around the flattened tail end with several small, secure stitches.
H. Optional Paw and Inner-Ear Details
The basic lion does not require separate paw pads or inner-ear pieces. Embroidery keeps the design simple and avoids adding small detachable parts.
For optional paw markings, use a small amount of darker yarn to embroider two or three short lines on the front of each foot. Keep the marks small and evenly spaced.
For inner ears, embroider a short curved line inside each ear using cream or a darker shade of golden yarn. Avoid attaching tiny separate pieces unless they can be securely sewn and are appropriate for the intended use.
7. Stuffing and Shaping
Good stuffing makes a major difference in the finished lion’s appearance. Take your time and add fiberfill gradually rather than pushing a large amount into each piece at once.
How to stuff each part
- Head: Add small tufts of fiberfill through the opening near the end of the pattern. Spread the stuffing toward the sides to create a rounded shape. Avoid lumps around the face.
- Body: Stuff until it holds its shape but can still be gently compressed. Keep the top opening free of fiberfill for sewing.
- Legs: Stuff only the rounded ends lightly. Keep the attachment edges flat.
- Tail: Use little or no stuffing, depending on how firmly you want it to hold its shape.
- Muzzle, ears, and mane: These parts do not need stuffing. Keep them flat enough to attach neatly.
Tips for an even finish
- Add fiberfill in small pieces.
- Use the blunt end of a crochet hook or a stuffing tool to distribute filling gently, taking care not to snag the stitches.
- Feel the outside of each piece to identify empty areas or lumps.
- Check the head and body from several angles as you stuff.
- Stop when the fabric is firm but the stitches are not stretched open.
Overstuffing can make the stitches spread apart, expose the fiberfill, and distort the shape. Understuffing can make the head or body look collapsed. Aim for a balanced, softly firm finish.
8. Embroider the Face
Embroider the face after the muzzle is attached but before joining the head to the body. This makes it easier to position the features and secure the yarn ends inside the head.
Step 1: Mark the eye positions
Place the head with the muzzle facing forward. Use pins or temporary yarn markers to identify two symmetrical eye positions above the muzzle.
The eyes should be at approximately the same height, with similar spacing from the center of the face. Check the placement from the front before embroidering.
Step 2: Embroider the eyes
Use dark brown or black embroidery yarn.
- Bring the needle out at the first eye position.
- Make two or three small horizontal or vertical stitches in the same area to form a compact eye.
- Insert the needle back into the head near the starting point.
- Repeat for the second eye, matching the first eye’s size and height.
Keep the eyes small and simple. For a softer expression, use brown yarn instead of black.
Step 3: Add the nose and mouth
If you have not already embroidered the nose and mouth on the muzzle, do so now.
- Make a small horizontal or triangular nose near the top center of the muzzle.
- Bring a short stitch down from the center of the nose.
- Add two short diagonal stitches to create a simple smiling mouth.
- Check that the nose and mouth align with the center of the head.
Step 4: Add optional eyebrows
For a more expressive lion, embroider one short, slightly curved stitch above each eye. Keep the eyebrows subtle and symmetrical.
Step 5: Secure the embroidery
After each feature is complete, take the needle through the head and bring it out at a nearby point. Tie off securely on the inside or weave the yarn tail through several stitches. Trim excess yarn only after checking that the embroidery cannot loosen easily.
For a child-oriented toy, embroidered features are preferable to detachable eyes. Avoid glued-on decorations and other small pieces that could come loose.
9. Final Assembly
Before sewing, arrange all the finished parts on a flat surface. Make sure the head, mane, body, legs, ears, and tail are proportionate.
Step 1: Attach the mane
The mane cap should already be positioned over the back and sides of the head.
- Center the cap over the crown.
- Check that its edge frames the face evenly.
- Make sure the textured loops are spread around the head rather than bunched together.
- Pin the cap at several points.
- Sew around the edge with small stitches, adjusting the cap as needed.
Check the front and side views frequently. The face should remain visible, and the mane should not cover the muzzle or intended eye positions.
Step 2: Attach the muzzle
Center the muzzle on the lower front of the head. Its top should sit below the eye line.
Pin the muzzle in place and check that the same amount of head is visible on each side. Sew around the perimeter with small stitches, keeping the muzzle flat.
Step 3: Attach the ears
Position one ear on each side of the upper head, slightly behind the front edge of the mane. Check that the ears have similar heights and angles.
Pin both ears before sewing. From the front, confirm that neither ear sits noticeably higher than the other. Sew each ear securely to the head and mane where the pieces overlap.
Step 4: Embroider the facial features
Embroider the eyes, nose, mouth, and optional eyebrows. If you embroidered the nose and mouth earlier, check that they remain centered after the mane and ears are attached.
Look at the face from straight ahead. Correct any uneven features before proceeding.
Step 5: Join the head and body
Place the head on top of the body, aligning the bottom center of the head with the body’s 12-stitch opening.
- Position the head so the face points straight forward.
- Pin the head to the body at the front, back, and both sides.
- Check the alignment from the front and side.
- Thread the body’s long sewing tail onto a yarn needle.
- Sew around the body opening, catching the corresponding stitches at the base of the head.
- Work around the entire seam, making small, even stitches.
- Before finishing, check that the head is upright and secure.
If the head wobbles, add a few extra stitches around the seam. Avoid pulling the yarn so tightly that the neck area becomes distorted.
Step 6: Attach the four legs
Place the two front legs at the lower front of the body, leaving a small, even gap between them. Position the back legs on the lower sides, slightly behind the front pair.
Pin all four legs before sewing. Set the lion on a flat surface to see whether the feet touch the surface evenly.
Sew each leg’s flattened top edge to the body using the long yarn tail. Use several passes if needed to secure the attachment. Keep the legs aligned and avoid pulling the body fabric into deep folds.
Step 7: Attach the tail
Place the tail at the center back of the body, low enough to hang naturally. Pin it in place and check that it does not pull the lion backward or sideways.
Sew around the flattened end of the tail using small, secure stitches. Confirm that the tuft is firmly attached and that the tail hangs freely.
Step 8: Finish the lion
- Weave in all loose yarn ends.
- Check every seam for gaps.
- Make sure the stuffing is not visible.
- Adjust the mane loops so they frame the face evenly.
- Gently shape the head, body, and paws with your hands.
- Place the lion on a flat surface and check its balance.
Your miniature crochet lion is now complete!
10. Customization Ideas
Once you are comfortable with the basic pattern, you can personalize your lion in several ways.
Change the mane color
Try rust, burnt orange, dark brown, caramel, or a mix of two complementary shades. A darker mane creates contrast with the golden face, while a lighter mane gives the lion a softer appearance.
If you use two colors, keep the cap in one main color and add the second color to selected loop stitches.
Adjust the body color
A pale yellow body creates a gentle, playful look. Deep golden or tan yarn gives the lion a more traditional appearance.
Make the mane fuller
Add another row of chain loops around the mane cap. Spread the loops evenly and check that the extra texture does not cover the face or make the cap too heavy.
Make a more compact mane
Use shorter chains for the mane loops, or work only one row of loops around the edge. This produces a tidier silhouette.
Change the pose
For a sitting lion, keep the back legs slightly wider apart and position the front legs beneath the front of the body. For a more upright appearance, adjust the placement of the front legs, but check the balance before sewing them permanently.
Add a tiny accessory
A small embroidered bow or a narrow crocheted scarf can give the lion a personalized look. Keep any accessory securely attached, especially if the lion is intended for a young child.
Make a larger or smaller lion
Use a different yarn weight and a suitably sized hook. A larger yarn generally creates a larger lion, while finer yarn creates a smaller one. The amount of stuffing and the relative size of the mane and muzzle may need adjustment.
These modifications can change the proportions of the finished toy. Compare the pieces as you work rather than assuming that every change will preserve the original dimensions.
11. Troubleshooting
| Problem | Likely cause | Practical solution |
|---|---|---|
| The head becomes oval instead of round. | Too many straight rounds or uneven tension. | Check the number of straight rounds and keep your stitches consistent. |
| The mane does not fit around the head. | The cap is too small, too large, or worked at a different tension. | Compare the cap with the head before attaching it. Adjust the hook or tension, or distribute the edge evenly. |
| The muzzle looks too large. | The muzzle covers too much of the lower face. | Recheck the muzzle size against the head before sewing. Remove an optional row if needed. |
| The muzzle looks too small. | The muzzle is narrower than the intended design. | Add a row of 8 sc before the final decrease row, then check the fit again. |
| The ears are uneven. | Their placement or shaping differs. | Compare the ears side by side and pin both before sewing. |
| The body tips over. | The legs are unevenly placed or the body is too soft. | Check that all four feet touch the surface and redistribute the stuffing. |
| The legs look asymmetrical. | The attachment points differ. | Measure the gaps visually, pin all four legs, and check from the front before sewing. |
| The tail attachment is loose. | Too few stitches were used to secure it. | Sew around the tail base again, catching both the tail and body fabric. |
| Stuffing shows through the stitches. | The hook is too large or the body is overstuffed. | Use a smaller hook or reduce the amount of stuffing. |
| The embroidered face looks uneven. | The features were placed without checking alignment. | Mark both eye positions before embroidering and compare their height and spacing. |
| The seams are bulky. | The yarn was pulled too tightly or too many stitches overlap in one area. | Use small, evenly spaced sewing stitches and avoid gathering the fabric. |
| The lion loses its shape after stuffing. | The pieces are too loosely crocheted or unevenly stuffed. | Use a smaller hook if needed and add fiberfill gradually, checking the shape from several angles. |
12. Care and Safety
Follow the care instructions for your yarn and fiberfill. If the materials are machine washable, place the lion in a suitable laundry bag and use the recommended gentle cycle. Otherwise, spot-clean it with a damp cloth and mild detergent, then allow it to dry completely.
Keep the following precautions in mind:
- Embroidered eyes and facial features are preferable for toys intended for young children.
- Avoid rigid supports, exposed wire, glued-on decorations, and detachable small components in a child-oriented toy.
- Sew the head, legs, ears, mane, and tail securely.
- Weave in all yarn ends so they cannot easily unravel.
- Inspect the seams and embroidery periodically if the lion is handled frequently.
- Do not assume the finished toy meets a particular age rating or safety certification without appropriate testing and assessment.
13. Frequently Asked Questions
Is this miniature lion suitable for beginners?
Yes. The main pieces use single crochet, increases, decreases, and simple sewing. Beginners who are comfortable working in spiral rounds should be able to follow the pattern, although assembling the mane and facial features may take extra patience.
Can I use a different yarn weight?
Yes. You can use a different yarn weight, but you should choose a hook that creates dense stitches. The finished lion’s size and proportions will change, so compare the pieces before sewing them together.
How do I keep the head round?
Follow the increase and decrease counts carefully, maintain consistent tension, and avoid adding extra straight rounds. Stuff the head gradually and spread the fiberfill evenly.
How do I make the mane fuller?
Add a second row of chain loops around the cap’s edge, spacing the loops evenly between the first row. Make sure the additional texture does not hide the face.
How firmly should I stuff the head and body?
Both pieces should feel softly firm and hold their shapes. They should not be so tightly stuffed that the stitches stretch open or the fabric becomes distorted.
Can I embroider the eyes instead of using safety eyes?
Yes. Embroidered eyes are a good option for a miniature lion, especially one intended for a young child. Use secure stitches and weave the ends into the head.
How do I keep the legs symmetrical?
Pin all four legs before sewing. Check their spacing from the front and sides, and place the lion on a flat surface to confirm that the feet touch evenly.
How can I make a larger or smaller lion?
Use a heavier yarn and a suitable hook for a larger lion, or finer yarn and a smaller hook for a smaller one. Changes in yarn weight can affect the mane, muzzle, and body proportions as well as the overall height.
Can I make the head and body as one piece?
This pattern uses separate pieces so the head and body can be shaped and stuffed independently. Joining them afterward also makes it easier to position the face and mane. A one-piece construction would require a different pattern and different shaping instructions.
Can I use a different color for the muzzle?
Absolutely. Cream, beige, light tan, and pale golden yarn all work well. Choose a shade that contrasts enough with the head for the muzzle to remain visible.
14. Quick Pattern Summary
Use this section as a compact reference while crocheting. The full instructions above explain the shaping, placement, and assembly in more detail.
Materials
- Golden yarn for the head, body, and legs
- Contrasting yarn for the mane and tail tuft
- Cream or beige yarn for the muzzle
- Suitable crochet hook, fiberfill, yarn needle, stitch markers, and scissors
- Dark embroidery yarn for the face
Main techniques: MR, sc, inc, dec, sl st, ch, continuous spiral rounds, sewing, stuffing, and embroidery.
Head
- Rounds 1–6: Increase from 6 to 36 sts.
- Rounds 7–12: 36 sc per round.
- Round 13: Decrease to 30 sts.
- Round 14: 30 sc.
- Round 15: Decrease to 24 sts.
- Round 16: Decrease to 18 sts.
- Round 17: Decrease to 12 sts.
- Round 18: Decrease to 6 sts and close.
Muzzle
- Work four rows in cream or beige yarn.
- Shape an oval and sew it to the lower front of the head.
- Embroider the nose and mouth.
Mane
- Increase from 6 to 36 sts over six rounds.
- Work three rounds of 36 sc.
- Add chain loops around the edge and sew the cap to the head.
Ears
- Two matching pieces.
- Increase from 6 to 12 sts, then work one straight round.
- Flatten and sew to the upper sides of the head.
Body
- Increase from 6 to 30 sts.
- Work four straight rounds.
- Decrease to 24, then 18, then 12 sts.
- Stuff and leave the top opening for joining to the head.
Legs
- Make four matching pieces.
- Increase from 6 to 12 sts.
- Work three straight rounds.
- Stuff lightly, flatten the top, and sew to the lower body.
Tail
- Work 6 sc per round for nine rounds.
- Attach a small contrasting tuft and sew the tail to the lower back of the body.
Finishing sequence
- Crochet all pieces.
- Attach the mane and muzzle.
- Attach the ears.
- Embroider the face.
- Join the head and body.
- Sew on the four legs.
- Attach the tail.
- Weave in ends, check seams, and reshape.
Conclusion
Your amigurumi crochet miniature lion brings together simple crochet shapes, a distinctive textured mane, and a sweet embroidered face. Work slowly, count each round, and check the placement of every piece before sewing it permanently.
Most importantly, enjoy personalizing your lion with your favorite golden shades and mane colors. With careful shaping and neat assembly, you can create a charming little lion to display, collect, or give as a handmade gift.
Leave a Comment