
Introduction
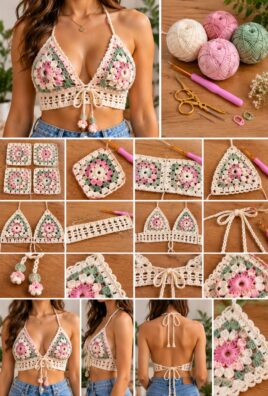
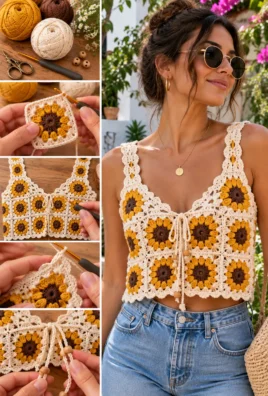
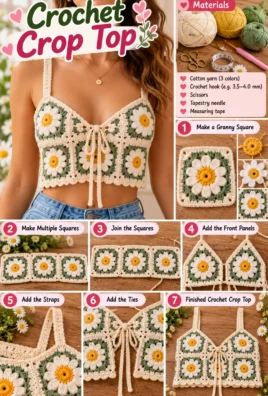
A crochet halter top is a stylish, lightweight garment that is perfect for warm-weather outfits, beach days, festivals, and casual summer styling. With two shaped front panels and adjustable ties, you can customize the fit, coverage, and overall look to suit your preferences. Choose a classic solid color, combine contrasting shades, or add simple stripes for a more playful design.
This crochet halter top pattern is designed for confident beginners who are ready to move beyond basic crochet projects. You will learn how to take measurements, check your gauge, shape two matching panels, connect the front, and create secure neck and back ties. The pattern also explains how to finish the edges neatly and adjust the dimensions for a more personal fit.
Because yarn stretch and body measurements vary, making a small gauge swatch and checking the fit before final assembly are important steps.
Finished Project Overview
- Project: Crochet halter top
- Skill level: Confident beginner
- Terminology: US crochet terms
- Construction: Two triangular front panels, a center connection, a lower edge, neck ties, and adjustable back ties
- Size range: Customizable to individual measurements
- Approximate sample front width: 14 inches before adding the center connection
- Approximate sample panel height: 7 inches
- Estimated working time: Approximately 4–8 hours, depending on experience and customization
- Recommended yarn: Lightweight or medium-lightweight cotton or cotton-blend yarn
- Recommended hook: Approximately 3.5–4.5 mm, adjusted to your yarn and gauge
- Main stitches: Chain, single crochet, half double crochet, and double crochet
- Straps and closure: Two adjustable neck ties and two adjustable back ties
The sample dimensions are illustrative rather than a universal size. Fit depends on your measurements, the yarn’s stretch and recovery, your hook size, and how much coverage you prefer.
Materials and Tools
Gather these supplies before starting:
- Lightweight or medium-lightweight yarn suitable for summer garments
- A crochet hook compatible with your chosen yarn
- Scissors
- Yarn needle
- Measuring tape
- Stitch markers
- Optional stitch counter
- Optional lining or removable bra cups
Choosing the right yarn
Cotton is a popular choice for summer garments because it is breathable and offers good stitch definition. Cotton blends can provide a different balance of softness, drape, and stretch.
Keep in mind that fibers behave differently:
- Cotton: Often has limited recovery after stretching, so check the fit and strap tension carefully.
- Cotton blends: May offer more flexibility, depending on the other fiber.
- Other lightweight yarns: Can produce a softer or more draped top, but the final fit may change with wear.
Choose a yarn that feels comfortable against your skin and check its care instructions before beginning.
Approximate yarn estimate
For the illustrative sample, allow approximately 200–350 yards of yarn. Larger panels, wider coverage, longer ties, a textured stitch pattern, or a decorative edging may require more.
This estimate is only a planning guide. Your actual yarn use will depend on gauge, yarn weight, stitch density, and the dimensions you choose.
Crochet Abbreviations
| Abbreviation | Meaning |
|---|---|
| ch | Chain |
| sl st | Slip stitch |
| sc | Single crochet |
| hdc | Half double crochet |
| dc | Double crochet |
| st | Stitch |
| sts | Stitches |
| inc | Increase |
| dec | Decrease |
| rep | Repeat |
| RS | Right side |
| WS | Wrong side |
| FO | Fasten off |
Essential Stitches and Techniques
Foundation chain
Make a slip knot and place it on your hook. Yarn over and pull the yarn through the loop on the hook to create one chain. Repeat until you have the required number of chains.
Keep the chain flexible but not excessively loose. If your foundation chain is much tighter than the rows worked into it, the lower edge may pull inward.
Single crochet
- Insert your hook into the indicated stitch.
- Yarn over and pull up a loop. You now have two loops on your hook.
- Yarn over again and pull through both loops.
One single crochet is complete.
Half double crochet
- Yarn over.
- Insert the hook into the indicated stitch.
- Yarn over and pull up a loop, leaving three loops on the hook.
- Yarn over and pull through all three loops.
Double crochet
- Yarn over and insert the hook into the indicated stitch.
- Yarn over and pull up a loop, leaving three loops on the hook.
- Yarn over and pull through the first two loops.
- Yarn over and pull through the remaining two loops.
Increasing stitches
To increase, work two stitches into the same stitch. This adds one stitch to the row and widens the panel.
For example, if a row begins with 10 stitches and you work one increase at each end, the row will contain 12 stitches.
Decreasing stitches
To decrease with single crochet, insert your hook into the first stitch and pull up a loop. Insert the hook into the next stitch and pull up another loop. Yarn over and pull through all three loops. Two stitches have become one.
The main sample pattern below uses increases rather than decreases to create its triangular panels.
Working in rows
At the end of a row, chain the number specified in the pattern and turn your work. The turning chain does not count as a stitch in the main panel instructions.
Work the first stitch into the first actual stitch of the previous row, not into the turning chain. Count the stitches at the end of every row to keep the panel symmetrical.
Making ties
Ties can be made with a long chain or a narrow crocheted strap. A chain is quick to make, while a narrow strap worked in single crochet creates a sturdier tie.
For this pattern, the ties are made from narrow single-crochet straps. Attach them securely to the top and back edges, and weave the yarn tails into the fabric rather than relying on a loose knot alone.
Measurements, Fit, and Gauge
A comfortable halter top begins with measurements rather than a fixed size label. The same stitch count can produce different results depending on yarn, hook size, tension, and how much stretch the fabric has.
Before crocheting, measure or estimate the following:
- Bust circumference: Measure around the fullest part of the bust.
- Front coverage: Decide how wide and tall you want each panel to be.
- Panel spacing: Decide whether the panels should touch, overlap slightly, or have a small center bridge.
- Top length: Measure from the desired upper point of the panel to the lower edge.
- Neck-tie length: Consider how much length you need to tie the straps comfortably.
- Back-tie length: Decide how much adjustment you want at the back.
- Preferred fit: Choose a snug, relaxed, or adjustable fit.
For front coverage, measure the area you want each panel to cover while wearing a comfortable bra or top as a reference. Do not assume that a particular panel size will fit everyone.
Check your gauge
The sample pattern uses single crochet for the panels. Aim for approximately 20 sc across 4 inches and 14 rows across 4 inches. This is a planning gauge, not a guarantee; adjust the hook to suit your yarn and desired fabric.
- Crochet a small swatch using single crochet.
- Measure 20 stitches across.
- Measure 14 rows vertically.
- Compare the swatch with the target gauge.
- Adjust your hook size if needed.
- If your gauge changes, recalculate the starting width and row count for the panels.
Crochet fabric may stretch during wear. Cotton, in particular, may stretch without fully returning to its original shape. Check the fabric’s behavior before deciding on the final dimensions.
Choose a Construction Method
This tutorial uses two triangular panels worked from the upper point downward. Each panel starts with a small number of stitches and gradually widens through increases. The wider lower edges form the bottom of the front, while the upper points receive the neck ties.
After making two matching panels, position them side by side and connect their inner edges with a small center bridge. Finish the lower edge, attach adjustable neck ties, and add back ties to help secure the top.
The sample panels are designed to measure approximately 7 inches wide and 7 inches tall before assembly, depending on gauge. Because each person’s desired coverage differs, use the sample as a starting point and check the fit before completing the ties.
Complete Crochet Halter Top Pattern
Part A: Calculate the Panel Size
For the sample, aim for a panel approximately 7 inches wide and 7 inches tall.
At the suggested gauge of about 5 single crochets per inch and 3.5 rows per inch, a panel that is 7 inches wide would need approximately 35 stitches across. A height of 7 inches would need approximately 25 rows.
To create a symmetrical triangle while keeping the stitch count manageable, increase at both ends of every other row. This produces a triangle whose width grows gradually while the row count increases at a steady pace.
Sample plan:
- Target panel width: approximately 7 inches
- Target panel height: approximately 7 inches
- Starting row: 2 sc
- Increase rows: add 1 sc at the beginning and 1 sc at the end
- Increase frequency: every other row
- Final sample row count: 35 rows
- Final stitch count: 36 sc
The sample’s exact width and height will depend on your gauge. If you want more coverage, add rows using the same increase sequence, checking the width as you work.
Part B: First Front Panel
Use single crochet throughout the panel. The increases are placed at the beginning and end of every even-numbered row. Odd-numbered rows after Row 1 are worked without increases.
Row 1: Ch 3. Sc in the second ch from the hook and in the next ch. (2 sc.) Turn.
Row 2: Ch 1. Work 2 sc in the first st, 1 sc in the next st, and 2 sc in the last st. (4 sc.) Turn.
Row 3: Ch 1. Sc in each st across. (4 sc.) Turn.
Row 4: Ch 1. Work 2 sc in the first st, sc across to the last st, and work 2 sc in the last st. (6 sc.) Turn.
Row 5: Ch 1. Sc in each st across. (6 sc.) Turn.
Row 6: Ch 1. Work 2 sc in the first st, sc across to the last st, and work 2 sc in the last st. (8 sc.) Turn.
Row 7: Ch 1. Sc in each st across. (8 sc.) Turn.
Row 8: Ch 1. Work 2 sc in the first st, sc across to the last st, and work 2 sc in the last st. (10 sc.) Turn.
Row 9: Ch 1. Sc in each st across. (10 sc.) Turn.
Row 10: Ch 1. Work 2 sc in the first st, sc across to the last st, and work 2 sc in the last st. (12 sc.) Turn.
Row 11: Ch 1. Sc in each st across. (12 sc.) Turn.
Row 12: Ch 1. Work 2 sc in the first st, sc across to the last st, and work 2 sc in the last st. (14 sc.) Turn.
Row 13: Ch 1. Sc in each st across. (14 sc.) Turn.
Row 14: Ch 1. Work 2 sc in the first st, sc across to the last st, and work 2 sc in the last st. (16 sc.) Turn.
Row 15: Ch 1. Sc in each st across. (16 sc.) Turn.
Row 16: Ch 1. Work 2 sc in the first st, sc across to the last st, and work 2 sc in the last st. (18 sc.) Turn.
Row 17: Ch 1. Sc in each st across. (18 sc.) Turn.
Row 18: Ch 1. Work 2 sc in the first st, sc across to the last st, and work 2 sc in the last st. (20 sc.) Turn.
Row 19: Ch 1. Sc in each st across. (20 sc.) Turn.
Row 20: Ch 1. Work 2 sc in the first st, sc across to the last st, and work 2 sc in the last st. (22 sc.) Turn.
Row 21: Ch 1. Sc in each st across. (22 sc.) Turn.
Row 22: Ch 1. Work 2 sc in the first st, sc across to the last st, and work 2 sc in the last st. (24 sc.) Turn.
Row 23: Ch 1. Sc in each st across. (24 sc.) Turn.
Row 24: Ch 1. Work 2 sc in the first st, sc across to the last st, and work 2 sc in the last st. (26 sc.) Turn.
Row 25: Ch 1. Sc in each st across. (26 sc.) Turn.
Row 26: Ch 1. Work 2 sc in the first st, sc across to the last st, and work 2 sc in the last st. (28 sc.) Turn.
Row 27: Ch 1. Sc in each st across. (28 sc.) Turn.
Row 28: Ch 1. Work 2 sc in the first st, sc across to the last st, and work 2 sc in the last st. (30 sc.) Turn.
Row 29: Ch 1. Sc in each st across. (30 sc.) Turn.
Row 30: Ch 1. Work 2 sc in the first st, sc across to the last st, and work 2 sc in the last st. (32 sc.) Turn.
Row 31: Ch 1. Sc in each st across. (32 sc.) Turn.
Row 32: Ch 1. Work 2 sc in the first st, sc across to the last st, and work 2 sc in the last st. (34 sc.) Turn.
Row 33: Ch 1. Sc in each st across. (34 sc.) Turn.
Row 34: Ch 1. Work 2 sc in the first st, sc across to the last st, and work 2 sc in the last st. (36 sc.) Turn.
Row 35: Ch 1. Sc in each st across. (36 sc.) FO.
This creates a triangular panel with increases at both edges on every even-numbered row. The final row contains 36 stitches.
Important fit check: Measure the panel before making the second one. If it is too narrow, continue with additional increase rows in the same alternating sequence. If it is too wide, remove some increase rows and use the last completed panel as your guide. The target dimensions are approximate and should be adjusted to your measurements.
Part C: Second Front Panel
Make a second panel using exactly the same instructions as the first.
Before fastening off, compare both panels:
- Each panel should have the same number of rows.
- Both should have 36 stitches across the final row in the sample.
- The sides should have the same slope.
- The upper points should be similar in shape.
- The lower edges should be the same width.
If one panel is larger, compare the row counts and gauge before assembly. Small differences can affect how the top sits when worn.
Part D: Join or Position the Panels
Lay both panels flat with their right sides facing up. Position them side by side with the upper points toward the neckline and the wider edges along the bottom.
The inner edges should meet or overlap slightly, depending on the coverage you prefer. For the sample, connect the panels with a small center bridge made from single crochet.
- Attach the yarn at the lower inner edge of the first panel.
- Work single crochet along the inner sloping edge toward the upper point, placing stitches evenly along the row ends.
- Continue across the matching inner edge of the second panel, keeping the panels aligned.
- Check the front width and center spacing before securing the yarn.
- Weave in the ends once you are satisfied with the position.
Because the inner edges are sloped, the number of stitches needed for the bridge depends on your actual panel dimensions. The important goal is to connect corresponding edge sections without gathering or stretching the panels. If the center gapes, reduce the space between the panels or add a few connecting stitches. If the center pulls inward, loosen the connection and redistribute the stitches.
Fit check: Temporarily position the panels against your body or over a suitable base layer before completing the lower edge. Confirm that the center connection gives you the coverage and spacing you want.
Part E: Lower Edge
The lower edge helps stabilize the panels and provides a neat line across the bottom of the top.
- With the right side facing you, attach the yarn at one lower outer corner.
- Ch 1.
- Work 1 sc into each stitch across the lower edge of the first panel.
- Work evenly across the center connection.
- Continue with 1 sc into each stitch across the lower edge of the second panel.
- Turn and work one more row of sc across the same edge if you want a firmer band.
- FO and weave in the ends.
For the sample, the two panel bases contain 36 stitches each, giving 72 stitches across the combined lower edges before accounting for the center connection. The center bridge may add a small number of stitches depending on how you connect the panels, so count the actual stitches along the completed edge rather than forcing the total to a fixed number.
If you add a second row, work one sc into each stitch from the previous row. The stitch count should remain the same as the first lower-edge row.
Part F: Neck Ties
Make two adjustable neck ties, one attached to the upper point of each panel.
For each tie:
- Attach yarn securely at the upper point of the panel.
- Ch 1 and work 1 sc into the same attachment area if needed to stabilize the base.
- Ch 2 and turn.
- Work 1 sc into the second ch from the hook.
- Continue making rows of sc across the narrow strap, turning at the end of each row, until the strap reaches your desired length.
For a more straightforward tie, you can instead make a long chain and work slip stitches back along it. A narrow single-crochet strap is generally sturdier, while a chain tie is faster and more flexible.
Aim for approximately 18–24 inches per neck tie, then check the length against your own measurements. Longer ties may be more comfortable if you prefer to tie them in a bow. Shorter ties may be suitable when you want less excess length.
Reinforce the attachment point by weaving the tail through several stitches on the wrong side of the panel. Avoid relying on a single loose knot.
Part G: Back Ties
Add two adjustable back ties to the lower outer edges of the panels. These help secure the top around the body.
For each back tie:
- Attach the yarn at the outer lower corner of a panel, close to the lower edge.
- Make a narrow single-crochet strap using the same method as the neck ties.
- Continue until the tie reaches your desired length.
- FO, leaving a tail long enough to reinforce the attachment.
- Repeat at the opposite side.
A practical starting range is approximately 18–24 inches per back tie. Check the length around your body before fastening off. You should be able to tie the straps securely without making them so tight that they distort the panels or restrict movement.
If you prefer one continuous back tie, make a long narrow strap and attach it securely at both lower outer corners. Test its length before weaving in the final ends.
Part H: Optional Edging
A single-crochet edging can smooth the sloping sides and give the panels a more finished appearance.
- Attach yarn at a lower outer corner.
- Work sc evenly along the outer sloping edge, placing stitches into row ends.
- Work around the upper area without covering the tie attachment point.
- Continue along the inner edge if desired.
- Work around the remaining panel and lower edge, keeping the stitches evenly spaced.
- Join neatly and FO.
Along row ends, the correct number of stitches depends on the height and tension of your rows. Place enough stitches to keep the edge flat, but avoid adding so many that it becomes wavy. If the edging changes the panel width noticeably, reassess the fit before finishing the ties.
Pattern correction for Row 2: Because the first row contains only 2 stitches, work 2 sc into each stitch to make 4 sc total. From Row 4 onward, increase by working 2 sc in the first stitch and 2 sc in the last stitch, with 1 sc in each stitch between them.
Sizing and Customization
This pattern is intended to be adjusted to your own measurements rather than used as a fixed universal size.
Adjusting panel width
The width is controlled by the number of increase rows. Each increase row adds 2 stitches to the row total.
If your gauge is 20 sc across 4 inches, you make about 5 stitches per inch. For a target panel width of 7 inches, multiply 7 by 5 to estimate 35 stitches. Since the increase pattern grows by 2 stitches at a time, you may finish with 34 or 36 stitches, then measure the panel and decide whether it needs another adjustment.
Adjusting panel height
The height depends on your row gauge and the number of rows worked. If your gauge is about 14 rows across 4 inches, you make approximately 3.5 rows per inch. For a target height of 7 inches, multiply 7 by 3.5 to estimate 24.5 rows.
Because the triangular shaping increases only on alternating rows, you may need to adjust the number of plain rows or change the increase frequency to achieve the width and height you want together. Always measure the panel rather than relying only on the row count.
Adjusting spacing and coverage
- More coverage: Increase the panel width or height, checking that the two panels still meet comfortably at the center.
- Less coverage: Reduce the dimensions while maintaining matching panels.
- More center coverage: Bring the panels closer together or make the center bridge slightly wider.
- Less center coverage: Reduce the bridge width, but check that the panels still sit securely.
- Longer lower edge: Increase the panel width or add a wider lower band.
- More adjustable fit: Make longer back ties and test their placement before fastening off.
Adjusting ties
Neck ties should be long enough to secure comfortably behind the neck without placing excessive tension on the panel points. Back ties should allow adjustment without pulling the outer corners out of shape.
The best tie length is the length that works with your measurements and preferred tying style. Test the top with the ties temporarily positioned before securing all the yarn ends.
Fit Checks Before Final Assembly
Check the garment before completing the edging and weaving in all final ends.
- Confirm that both panels are the same size.
- Check the desired front coverage.
- Adjust the spacing between the panels.
- Test the neck-tie placement.
- Test the back-tie length.
- Check that the lower edge lies comfortably against the body.
- Make corrections before weaving in the final ends.
The top should feel secure without restricting movement or depending on excessively tight ties. If you plan to wear it over a lining or removable cups, check the fit with those additions in place.
Finishing and Care
Complete these finishing steps:
- Weave in loose yarn ends.
- Reinforce the neck-tie and back-tie attachment points.
- Check the center connection and panel seams.
- Confirm that the edging lies flat.
- Measure the finished top.
- Block gently if appropriate for the yarn.
- Follow the yarn label’s washing and drying instructions.
Blocking can improve the shape of the panels, but it cannot correct major stitch-count errors.
Cotton and cotton-blend yarns may change shape after washing or repeated wear. Avoid excessive heat and follow the care instructions for your particular fiber. After washing, reshape the top gently and allow it to dry as recommended. Check the straps and attachment points periodically to make sure they remain secure.
Troubleshooting Common Problems
| Problem | Likely Cause | Solution |
|---|---|---|
| The panels are too narrow | Too few increase rows or a tighter-than-expected gauge | Add increase rows or try a larger hook, then measure again. |
| The panels are too wide | Too many increase rows or a looser gauge | Remove some increase rows or use a smaller hook for a new panel. |
| The triangular shape looks uneven | Increases are placed inconsistently | Increase at both ends of every designated increase row and count stitches at the end of each row. |
| The two panels do not match | Different row counts, tension, or hook sizes | Compare the panels row by row and remake or adjust the smaller panel before joining. |
| The center connection gapes | The panels are too far apart or the bridge is too loose | Reduce the spacing or make the bridge narrower and more secure. |
| The lower edge curls | The foundation or edging is too tight | Relax your tension and check that the lower-edge stitches are distributed evenly. |
| The top stretches too much during wear | The yarn has limited recovery or the ties pull on the fabric | Check the fit, use a suitable yarn with better recovery, and reinforce the attachment points. |
| The neck ties feel uncomfortable | The ties are too short, too narrow, or too tight | Adjust their length and test the top before fastening off. |
| The back ties are too short | The length was not checked around the body | Extend the ties before weaving in their ends. |
| The straps pull away from the fabric | Attachment points are not sufficiently reinforced | Sew the tails through several stitches and reinforce the strap base. |
| The edging becomes wavy | Too many stitches were placed along row ends | Reduce the stitch frequency and space the edging evenly. |
| The garment provides less coverage than expected | Panel dimensions or spacing do not suit your measurements | Increase the panel dimensions or adjust the center connection before completing the ties. |
Customization Ideas
Choose your favorite colors
- Solid neutrals: Cream, beige, black, or brown create a versatile summer top.
- Pastel shades: Soft pink, lavender, mint, or pale yellow give the garment a gentle look.
- Contrasting panels: Use one color for each panel to create a bold, modern design.
- Simple stripes: Change colors after a few rows for a striped effect.
- Textured stitches: Try a different stitch pattern after making a gauge swatch, remembering that texture can affect stretch and coverage.
Adjust the lower edge and straps
A wider lower band can provide a more substantial finish, while a narrow edge creates a lighter look. Longer ties allow more flexibility in how the top is secured. Shorter ties may give a tidier finish when you prefer smaller bows.
Optional lining or removable cups
If you want additional coverage, you can add a suitable lining or removable cups. Check the fit with the lining or cups in place, and make sure they do not pull the crochet fabric out of shape.
How the materials affect the final fit
Yarn weight, hook size, stitch pattern, and panel dimensions all affect the finished garment. A larger hook may create a looser fabric, while a smaller hook may make it firmer. A textured stitch may use more yarn and create a different drape from single crochet.
Make a swatch whenever you change yarn or stitch pattern, and reassess the measurements before making both panels.
Frequently Asked Questions
1. Is this crochet halter top suitable for beginners?
Yes, it is suitable for confident beginners who know basic crochet stitches. The main skills are working single crochet in rows, increasing stitches, measuring panels, and attaching ties securely.
2. What yarn is best for a summer halter top?
Cotton and cotton-blend yarns are popular choices because they are breathable and offer good stitch definition. Consider stretch and recovery, since the garment needs to maintain its shape during wear.
3. How do I calculate my size?
Measure your desired front coverage, panel height, bust circumference, and preferred spacing between panels. Use your gauge to estimate the stitch count, then measure the first panel before making the second.
4. How much yarn will I need?
The illustrative sample may use approximately 200–350 yards. Larger panels, longer ties, extra edging, and different yarn weights can change the amount required.
5. How do I make the panels wider?
Work additional increase rows, adding one stitch at the beginning and one at the end of each increase row. Measure as you go so the panel reaches your preferred width.
6. How do I adjust the coverage?
Increase or reduce the panel width and height, then adjust the center spacing. Check the panels against your measurements before joining them permanently.
7. How long should the neck ties be?
A useful starting range is approximately 18–24 inches per tie. The correct length depends on your preferred tying style and measurements, so test the ties before fastening off.
8. How can I keep the top from stretching too much?
Choose yarn with suitable recovery, check the fabric’s stretch before assembly, and reinforce the tie attachment points. Avoid making the ties so tight that they distort the panels.
9. Do I need to line the top?
Lining is optional. You may prefer it for additional coverage or comfort, depending on the yarn and how you plan to wear the top. Check the fit with any lining or removable cups in place.
10. Can I use a different stitch pattern?
Yes, but make a gauge swatch first. A different stitch pattern can change the panel dimensions, fabric stretch, yarn requirements, and coverage.
11. How should I wash the finished garment?
Follow the yarn label’s washing and drying instructions. Cotton and cotton blends may change shape with repeated wear or washing, so reshape the garment gently when needed.
12. How can I make the top fit more securely?
Adjust the center spacing, check the lower edge, and make sure the neck and back ties are long enough to secure comfortably. Reinforce the tie attachment points and avoid relying on overly tight ties to hold the garment in place.
Conclusion
This crochet halter top is a versatile summer project that lets you customize the shape, coverage, colors, and ties to suit your style. Take your time measuring the panels, check the fit before final assembly, and reinforce the attachment points for a more secure finish.
Whether you choose soft pastels, classic neutrals, or bold contrasting colors, you can make a handmade top that feels personal and unique.
Which color combination would you choose for your crochet halter top, and would you prefer a simple solid design or contrasting panels?
Leave a Comment