
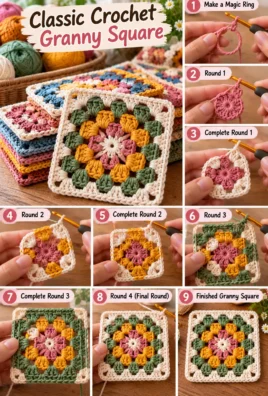
A classic crochet granny square is one of the most recognizable and versatile crochet motifs. It is made by working groups of double crochet stitches into spaces between clusters, starting at the center and gradually building outward. Four corner spaces create the square shape, while additional clusters extend the sides with each round.
Granny squares are popular because they are easy to customize and can be joined together to make blankets, cushion covers, tote bags, scarves, cardigans, table runners, and other decorative accessories. You can use a single color for a simple, traditional look or change colors between rounds to create a colorful design.
In this tutorial, you will learn how to prepare your materials, understand the essential stitches, make a classic granny square from a magic ring, work five complete rounds, change colors, finish your motif, and solve common problems.
The pattern uses US crochet terminology throughout and is worked in joined rounds without turning. The instructions include stitch and cluster counts to help you keep your square even as it grows.
1. Project Overview
- Project name: Classic Crochet Granny Square
- Skill level: Beginner
- Construction: Worked in joined rounds from the center outward
- Recommended yarn: Smooth worsted-weight yarn
- Suggested hook: 5 mm (US H-8), adjusted to suit your yarn and tension
- Estimated time: Approximately 30–60 minutes for a small square, depending on experience
- Estimated finished size: About 5–6 inches across after four rounds, although five rounds may make a larger square depending on tension
- Techniques: Magic ring, chain stitch, double crochet, granny clusters, slip-stitch joining, and fastening off
- Potential uses: Blankets, bags, cushions, scarves, cardigans, and decorative accessories
These dimensions and timing are estimates, not guaranteed results. The finished size depends on yarn thickness, hook size, tension, and the number of rounds you complete.
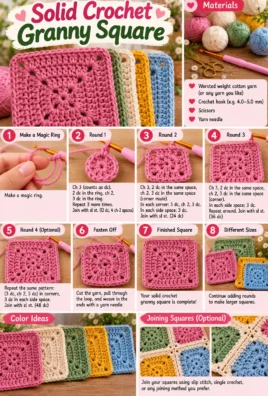
2. Materials and Tools
Gather the following supplies before you begin.
- Smooth worsted-weight yarn: Approximately 15–25 yards for a small square of around four rounds. This is an estimate; a larger square or heavier yarn may require more.
- Crochet hook: A 5 mm hook is a useful starting point for many worsted-weight yarns.
- Scissors: For cutting the yarn when the square is finished.
- Yarn needle: For weaving in loose ends.
- Measuring tape or ruler: To check the dimensions of your square.
- Optional stitch marker: Useful for marking a corner space or helping you keep track of the round.
Choosing yarn
Smooth yarn in a light or medium color is especially helpful when learning. The stitches and spaces are easier to see than they are with very dark, fuzzy, or novelty yarn.
If you want a multicolored granny square, choose two or more colors that work well together. The amount of each color depends on how many rounds you make in that color. Outer rounds usually contain more clusters than inner rounds, so they may require more yarn.
For your first square, use one color if you want to focus entirely on the stitch pattern. You can experiment with color changes once the construction feels familiar.
3. US Crochet Terminology
This tutorial uses US crochet terminology. US double crochet is different from UK double crochet, so check the terminology used by any pattern you follow.
- ch — Chain: A basic stitch used to begin a project or create spaces.
- sl st — Slip stitch: A short stitch used to join rounds or move across stitches.
- dc — Double crochet: A stitch made by pulling yarn through loops in stages.
- st — Stitch: One completed crochet stitch.
- sts — Stitches: More than one stitch.
- sp — Space: An opening in the crochet fabric.
- ch-sp — Chain space: An opening created by chain stitches.
- rnd — Round: One complete circuit around the motif.
- rep — Repeat: Work the stated sequence again.
- beg — Beginning: The start of a round or instruction.
- sk — Skip: Pass over a stitch or space without working into it.
- FO — Fasten off: Secure the yarn when finishing a piece.
Essential counting convention
Throughout this pattern, the beginning chain three counts as the first double crochet of the first cluster in each round. The slip stitch used to join a round does not count as a double crochet or a cluster.
The square is worked in joined rounds without turning. Each corner contains two three-dc clusters separated by chain two. Side clusters are separated by chain one.
These conventions remain the same throughout the five-round pattern.
4. Essential Techniques Before Starting
How to make a slip knot
- Leave a yarn tail several inches long.
- Cross the yarn to form a loop.
- Pull a section of yarn through the loop to create a second loop.
- Place the second loop on your crochet hook.
- Gently pull the tail and working yarn to tighten the knot around the hook.
The loop should fit comfortably around the hook. Avoid tightening it so much that the hook cannot move.
How to make a magic ring
A magic ring creates an adjustable loop that can be tightened after the first stitches are worked into it.
- Leave a yarn tail several inches long.
- Form a loop with the yarn, keeping the tail crossed over the working yarn.
- Insert your hook through the loop and catch the working yarn.
- Pull a loop through the ring.
- Chain one to secure the loop. This securing chain does not count as a double crochet.
- Work the stitches required by the pattern into the ring, making sure to catch the ring itself as you work.
- When the stitches are complete, pull the yarn tail to close the center.
Keep the starting ring loose enough to work into until the first round is finished. Tighten it gently afterward.
An alternative to the magic ring
If you find the magic ring difficult, chain four and join the first and last chains with a slip stitch to make a small ring. Work the first round into the center of this ring.
This method is often easier to learn, although it may leave a small opening in the center.
How to make a chain stitch
- Hold the active loop on your hook.
- Bring the working yarn over the hook. This is called a yarn over.
- Catch the yarn with the hook.
- Pull the yarn through the active loop.
You have made one chain stitch. Repeat the movement as required by the pattern.
The loop remaining on the hook is the active loop, not a completed chain stitch.
How to make a double crochet stitch
- Yarn over once.
- Insert the hook into the specified stitch or space.
- Yarn over again and pull up a loop. You now have three loops on the hook.
- Yarn over and pull through the first two loops. Two loops remain.
- Yarn over again and pull through the remaining two loops.
You have completed one double crochet.
How to make a slip stitch
- Insert the hook into the specified stitch or space.
- Yarn over.
- Pull the yarn through the stitch or space and through the active loop on the hook.
A slip stitch is shorter than a double crochet and is useful for joining rounds.
What is a granny cluster?
A standard granny cluster consists of three double crochet stitches worked into the same space.
The three stitches must share one opening. Do not work one double crochet into each of three separate stitches.
Understanding side spaces and corner spaces
A side chain space is the opening between clusters along one side of the square. In this pattern, chain one separates neighboring clusters along the sides.
A corner space is the larger opening created by chain two at each corner. Each corner receives a group of three dc, chain two, and three dc.
Insert the hook into the opening itself, rather than into the top of a nearby double crochet stitch. Correct placement is essential for keeping the motif square.
5. Complete Classic Granny Square Pattern
This pattern begins with four clusters in a magic ring and adds one side cluster per side with every new round.
Before you begin:
- Do not turn your work after joining a round.
- Each cluster contains three double crochet stitches.
- Each corner group contains three dc, chain two, and three dc, all worked into the same corner space.
- Chain one separates neighboring clusters along the sides.
- The beginning chain three counts as one dc in the first cluster of each round.
- Join every round with a slip stitch to the top of the beginning chain three.
- The joining slip stitch does not count as a cluster or dc.
Round 1: Create the center
- Make a magic ring.
- Chain three. This counts as the first dc of the first cluster.
- Work two dc into the ring to complete the first cluster.
- Chain two to create the first corner space.
- Work three dc into the ring, then chain two.
- Repeat Step 5 two more times, making a total of four clusters and four chain-two spaces.
- After the fourth cluster, chain two and join with a slip stitch to the top of the beginning chain three.
- Pull the magic-ring tail to close the center.
Round 1 check
- Clusters: 4
- Corner spaces: 4
- Side clusters: 0 additional clusters between corners
- Double crochet stitches: 12, including the beginning chain three
You should see four clusters arranged around the center, with one open corner space between each neighboring pair.
Round 2: Form the four corners
- After joining Round 1, slip stitch across the next two dc stitches and into the first corner space. If your hook is already at a corner space, you can begin there.
- Chain three, counting it as the first dc of the first cluster.
- Work two dc into the same corner space.
- Chain two, then work three dc into that same corner space. This completes the first corner group.
- Chain one.
- In the next corner space, work three dc, chain two, and three dc into that same space.
- Chain one, then work the same corner group in the next corner space.
- Chain one and work the corner group in the final corner space.
- Chain one and join with a slip stitch to the top of the beginning chain three.
Each corner now contains two clusters separated by chain two. There is a chain-one space between each pair of neighboring corners.
Round 2 check
- Clusters: 8 total
- Corner spaces: 4
- Corner clusters: 8
- Side clusters worked into side spaces: 0
- Chain-one spaces along the sides: 4
- Double crochet stitches: 24, including the beginning chain three
The motif should look more clearly square, with four corners and one open chain-one space along each side.
Round 3: Add the first side clusters
- After joining Round 2, slip stitch across the next two dc stitches and into the first corner space.
- Chain three, then work two dc into that corner space.
- Chain two, then work three dc into the same space to complete the first corner group.
- Chain one.
- Work three dc into the first side chain-one space. These three stitches form one side cluster.
- Chain one.
- Work a corner group in the next corner space: three dc, chain two, and three dc.
- Repeat the side-and-corner sequence around the square. On each side, work one cluster into the existing chain-one space, with chain one before and after it.
- After completing the fourth corner group, work the final side cluster into the chain-one space on the last side. Chain one, then join with a slip stitch to the top of the beginning chain three.
Make sure you work the side clusters into the open chain-one spaces, not into the tops of the double crochet stitches.
Round 3 check
- Clusters: 12 total
- Corner spaces: 4
- Corner clusters: 8
- Side clusters: 4 total, one per side
- Chain-one spaces along the sides: 8, two per side
- Double crochet stitches: 36, including the beginning chain three
Each side now has one side cluster between its two corner groups. The square should be larger while retaining four distinct corners.
Round 4: Expand the square
- Slip stitch into the first corner space.
- Chain three, then work two dc into the same space.
- Chain two, then work three dc into that corner space to complete the corner group.
- Chain one.
- Work three dc into the first side chain-one space, then chain one.
- Work three dc into the next side chain-one space, then chain one.
- Work the next corner group in the following corner space.
- Repeat the same arrangement on the remaining sides: after each corner group, chain one, work a cluster into every side chain-one space, and chain one between adjacent clusters.
- After the fourth corner group, complete the clusters and chain spaces along the final side, then join with a slip stitch to the top of the beginning chain three.
Each side now has two side clusters between the corner groups.
Round 4 check
- Clusters: 16 total
- Corner spaces: 4
- Corner clusters: 8
- Side clusters: 8 total, two per side
- Chain-one spaces along the sides: 12, three per side
- Double crochet stitches: 48, including the beginning chain three
The square should now have two side clusters along each edge, with a chain-one space between neighboring clusters.
Round 5: Continue growing the square
- Slip stitch into the first corner space.
- Chain three, then work two dc into that corner space.
- Chain two, then work three dc into the same space to complete the corner group.
- Chain one.
- Work three dc into each of the three side chain-one spaces along the next side, placing chain one between neighboring clusters.
- Work the next corner group into the following corner space.
- Repeat around the square, placing three side clusters along each side and a corner group into each corner space.
- After completing the fourth corner group, work the three side clusters and chain spaces along the final side.
- Join with a slip stitch to the top of the beginning chain three.
As you work, identify the open chain-one spaces from the previous round. Each space should receive exactly one three-dc cluster.
Round 5 check
- Clusters: 20 total
- Corner spaces: 4
- Corner clusters: 8
- Side clusters: 12 total, three per side
- Chain-one spaces along the sides: 16, four per side
- Double crochet stitches: 60, including the beginning chain three
Your square should now have three side clusters along each edge. The four corner spaces remain in the same positions relative to the square’s corners.
6. Stitch Counts and Pattern Verification
Use this summary to check the pattern as your square grows.
- Round 1: Four clusters, four corner spaces, 12 dc stitches.
- Round 2: Eight clusters, four corner spaces, four side chain-one spaces, 24 dc stitches.
- Round 3: Twelve clusters, four corner spaces, four side clusters, eight side chain-one spaces, 36 dc stitches.
- Round 4: Sixteen clusters, four corner spaces, eight side clusters, twelve side chain-one spaces, 48 dc stitches.
- Round 5: Twenty clusters, four corner spaces, twelve side clusters, sixteen side chain-one spaces, 60 dc stitches.
The cluster total increases by four with every round. Each new round adds one side cluster along each of the four sides. The four corner spaces remain unchanged.
Remember that the beginning chain three counts as one dc, and the joining slip stitch does not count as a dc or a cluster.
7. How to Continue Beyond Round Five
You can keep growing the square until it reaches the size you need. Every new round follows the same construction method, but each side has one more cluster than it did in the previous round.
For example:
- Round 6 has four side clusters per side.
- Round 7 has five side clusters per side.
- Round 8 has six side clusters per side.
For every additional round:
- Slip stitch into the next corner space.
- Chain three, then work two dc into that corner space.
- Chain two, then work three dc into the same space to complete the corner group.
- Chain one.
- Work three dc into every existing side chain-one space, placing chain one between adjacent clusters.
- Work the same corner group in the next corner space.
- Repeat around the square, working the appropriate number of side clusters between each pair of corners.
- Complete the final side and join with a slip stitch to the top of the beginning chain three.
Before starting each new round, identify the four corner spaces and count the side chain-one spaces. This is easier and more reliable than trying to memorize the entire pattern.
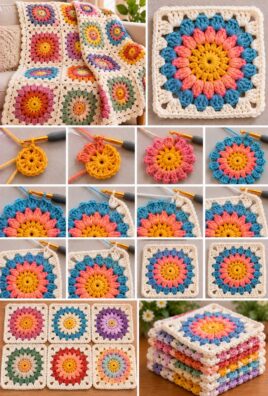
8. Changing Colors
You can make a classic granny square in one color or create a multicolored motif by changing yarn between rounds. Color changes do not affect the number or placement of clusters.
Making a single-color square
Continue using the same yarn for every round. Join each round with a slip stitch and move to the next corner space as described in the pattern.
Changing colors between rounds
- Complete the final cluster of the current round and join it with a slip stitch to the beginning chain three.
- Cut the old yarn, leaving a tail several inches long.
- Pull the cut end through the active loop to secure it.
- Make a slip knot with the new color.
- Insert the hook into a corner chain-two space and place the new loop on the hook. Secure the yarn with a slip stitch.
- Chain three, counting it as the first dc of the first cluster.
- Work two dc into the same corner space, then continue with the corner group and the rest of the round.
- Weave in the yarn tails with a yarn needle after finishing.
Attaching the new color in a corner space provides a consistent starting point. Avoid making bulky knots; instead, weave the tails through several stitches on the back of the square, changing direction where practical.
Simple color combinations
- Alternating two colors: Use one color for one round and the second color for the next.
- A new color each round: Create distinct rings that emphasize the motif’s structure.
- A contrasting center: Use one color for the first round and another for the outer rounds.
- A contrasting final round: Frame the square with a border-like outer color.
Choose colors that suit your intended project. For a blanket, making a small sample first can help you decide whether the colors look balanced together.
9. How to Keep the Square Flat and Even
A classic granny square should lie reasonably flat. Small differences in tension are normal, but consistent stitch placement helps prevent curling and uneven edges.
Maintain consistent tension
Try to keep the loops and chain stitches a similar size. Very tight tension can make the corners pull inward, while overly loose tension can create wavy edges.
Work into the correct spaces
Side clusters belong in the chain-one spaces. Corner groups belong in the chain-two spaces at the four corners. Working into the tops of nearby dc stitches instead of the intended spaces can distort the pattern.
Keep all four corners open
Each corner space must remain identifiable. Work the complete corner group into that space: three dc, chain two, and three dc.
Avoid missing or extra clusters
Count the side spaces before beginning a round. Each side chain-one space should receive one cluster, and no additional cluster should be inserted between the spaces.
Join without pulling too tightly
A tight joining slip stitch can pull the fabric inward. Keep the join secure but relaxed, and use the same joining method each round.
Check the shape regularly
After each round, place the square on a flat surface. Check that all four sides have the same number of side clusters and that the corners are clearly defined.
If the square curls inward, inspect your tension and stitch placement before changing the hook size. If the edges ripple, check for extra clusters or overly loose stitches.
10. Finishing the Square
When your square reaches the desired size, finish it carefully.
- Complete the final round and join it with a slip stitch to the top of the beginning chain three.
- Cut the yarn, leaving a tail several inches long.
- Pull the cut end through the active loop and tighten gently.
- Thread the tail onto a yarn needle.
- Weave the tail through several stitches on the wrong side of the square.
- Change direction where practical to help secure the end.
- Repeat with any other loose yarn tails.
- Trim the excess yarn carefully without cutting the crochet fabric.
- Check the four corners and edges, then measure the finished square.
Blocking the square
Blocking is optional. It can help make the corners more defined and bring multiple squares closer to the same dimensions.
Wet blocking: If the yarn’s care instructions allow it, gently wet the square, remove excess water without wringing, shape it into a square, and allow it to dry completely.
Steam blocking: Steam may help some fibers relax, but it can damage or flatten others. Follow the yarn manufacturer’s care guidance and avoid applying high heat or direct steam to fibers that may be damaged.
If you are unsure how your yarn will respond, test the method on a small swatch first. Always let the square dry completely before joining it to other motifs.
11. Troubleshooting Common Problems
The square looks round instead of square
Likely cause: The corner spaces may be missing, misplaced, or worked incorrectly.
Solution: Check that you have four corner spaces and that every corner group contains three dc, chain two, and three dc. If the construction is incorrect, undo the affected round and work it again.
The corners are difficult to identify
Likely cause: The chain-two spaces may be too tight or hidden by nearby clusters.
Solution: Look for the opening between the two clusters of each corner group. If necessary, use a stitch marker to mark each corner before beginning the next round.
The square curls inward
Likely cause: Your tension may be too tight, or one or more side clusters may be missing.
Solution: Check the number of side clusters on each edge. If the counts are correct, try relaxing your tension or using a slightly larger hook for your next square.
The edges ripple or ruffle
Likely cause: Extra clusters may have been added, or your chain stitches and dc stitches may be too loose.
Solution: Count the side spaces and make sure each space contains only one cluster. If the stitch placement is correct, try a slightly smaller hook or more consistent tension.
The sides are uneven
Likely cause: One side may have an extra or missing cluster, or your tension may change as you work.
Solution: Compare the number of side clusters along all four edges. Undo the section where the counts first differ and correct it rather than forcing the square into shape.
The stitch count does not match
Likely cause: A chain space may have been skipped, or an extra cluster may have been worked.
Solution: Count the four corner spaces first, then count the clusters between them. Remember that the beginning chain three counts as one dc in the starting cluster.
The gaps between clusters are too large
Likely cause: Your chain spaces may be too loose, or your hook may be large relative to the yarn.
Solution: Check that you are making chain one between side clusters and chain two at corners. If the pattern is correct but the fabric remains too open, try a smaller hook.
The center ring remains open
Likely cause: The magic-ring tail may not have been pulled firmly enough, or the tail may have caught on a stitch.
Solution: Gently pull the starting tail before weaving it in. If you used a chain-ring alternative, a small opening may remain and is normal for that method.
The joining seam looks bulky
Likely cause: The slip-stitch join may be too tight, or several yarn tails may overlap in one spot.
Solution: Keep the joining stitch relaxed and weave in the tails separately when possible. Avoid bulky knots.
The square twists after several rounds
Likely cause: Tension may be inconsistent, or some clusters may have been worked into stitch tops instead of chain spaces.
Solution: Check the corner groups and side-cluster placement. Keep the same side facing you and do not turn the work between rounds.
A cluster was worked into a stitch instead of a chain space
Likely cause: The hook was inserted into the top of a dc stitch rather than the opening between clusters.
Solution: Undo the affected cluster and insert the hook into the correct chain-one or chain-two space. Check the remaining spaces on that side before continuing.
The last round has too many or too few side clusters
Likely cause: One or more side chain-one spaces were missed, or a cluster was accidentally added where there was no chain space.
Solution: Count the spaces along each side before working into them. Place one cluster in every existing side chain-one space, then check that each side has the same number of clusters.
12. Beginner Tips
- Use smooth yarn: Clear stitch definition makes it easier to find spaces.
- Count clusters: While learning, counting groups of three dc can be easier than counting every stitch individually.
- Mark the corners: A stitch marker can help you find the four corner spaces quickly.
- Check every round: Confirm the four corners and side-cluster counts before moving on.
- Keep the active loop secure: Leave the hook in the loop or use a marker if you pause.
- Avoid tight joins: The joining slip stitch should secure the round without pulling the fabric inward.
- Practice double crochet separately: If the stitch is still unfamiliar, make a small swatch before working on the granny square.
Consistent stitch placement matters more than speed. Work slowly enough to identify each space, and undo a few stitches when necessary rather than continuing with an error.
13. Customization and Project Ideas
A classic granny square can be adapted to many projects.
- Blankets and throws: Make multiple squares and join them into rows.
- Tote bags: Join motifs into panels, then add a base, sides, and handles.
- Cushion covers: Arrange squares into front and back panels.
- Scarves: Join motifs in a strip or a longer arrangement.
- Cardigans: Combine squares into garment panels, planning the overall size and openings carefully.
- Table runners: Arrange squares in a row or grid.
- Decorative accessories: Use small motifs for pouches and other handmade items.
Adjusting yarn weight and hook size
Heavier yarn generally produces a larger, thicker square, while lighter yarn makes a smaller, lighter motif. A larger hook may create more open fabric, while a smaller hook may produce denser stitches.
These changes affect the finished dimensions and drape, so make a sample square before beginning a larger project. Novelty yarn may add texture, but it can make stitch placement more difficult to see.
Planning multiple squares
For a larger project, try to make every square with the same yarn weight, hook size, stitch pattern, and tension. Use the same number of rounds and measure the motifs before joining them.
An approximate blanket width can be estimated as:
Estimated blanket width ≈ width of one square multiplied by the number of squares across, plus the added width of seams and borders.
This is only an estimate. The joining method, seam thickness, border, and blocking can all affect the final dimensions.
14. Frequently Asked Questions
Is a classic granny square suitable for beginners?
Yes. Once you understand chain stitches, double crochet, and slip-stitch joining, the repeated clusters make the pattern easier to follow. A smooth, light-colored yarn is especially helpful for beginners.
What yarn is best for a granny square?
Smooth worsted-weight yarn is a practical starting point because it makes the stitches and spaces easy to see. You can use other weights once you are comfortable with the pattern.
Which crochet hook size should I use?
A 5 mm hook is a useful starting point for many worsted-weight yarns. Check the yarn label and adjust if your square is too tight, too loose, or not lying flat.
Why does my granny square curl?
Tight tension, missing clusters, or incorrect stitch placement can cause curling. Check the four corner spaces and count the side clusters before changing your hook size.
Why does my square look round?
The corners may not have been formed correctly. Check that every corner contains two three-dc clusters separated by chain two, all worked into the same corner space.
How many rounds should I make?
Make as many rounds as needed for your intended project. A few rounds create a small motif, while additional rounds create a larger square. Measure your work as you go.
Can I crochet a granny square in one color?
Yes. Use the same yarn for every round. The pattern’s cluster and corner construction stays exactly the same.
How do I change colors neatly?
Finish and join the previous round, fasten off the old color, and attach the new color in a corner chain-two space. Weave in the yarn tails securely when the square is finished.
Why are my corner spaces difficult to find?
The chain-two opening may be tight or hidden by the surrounding stitches. Look between the two clusters of the corner group and consider marking the space before beginning another round.
Do I need to block every square?
No. Blocking is optional, but it can help even out the shape and size of motifs intended for a larger project. Always use a method appropriate for the yarn fiber.
How do I make multiple squares the same size?
Use the same yarn, hook, number of rounds, and stitch pattern. Keep your tension consistent and measure each square before joining it.
What can I make with classic granny squares?
You can use them for blankets, cushions, tote bags, scarves, cardigans, table runners, and many other accessories. Choose a joining method that suits the project’s appearance and flexibility.
15. Final Thoughts
The classic granny square is a useful crochet skill because it combines a few basic stitches into a motif that can be repeated and customized in countless ways. The most important details are maintaining four corner spaces, working clusters into the correct chain spaces, and adding one side cluster per side with each new round.
Start with a small square, count your clusters, and check the shape after every round. When the construction feels familiar, experiment with colors, yarns, and additional rounds to create motifs for your own crochet projects.
Leave a Comment