
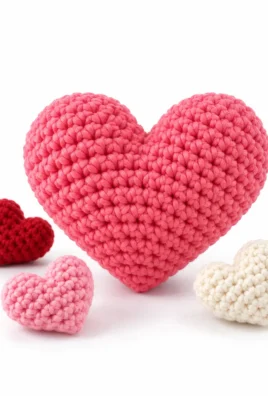
A handmade crochet heart-shaped pillow adds a cozy, personal touch to a bedroom, sofa, reading nook, or seasonal display. Choose soft pinks and reds for a romantic look, bright colors for a playful accent, or neutral yarn for a minimalist style.
This pattern creates a heart-shaped pillow from two matching crocheted panels. Each panel is worked from the pointed bottom upward, with increases forming the tapered sides and two separately shaped upper lobes creating the heart’s rounded top. The panels are joined around the edge, stuffed gradually, and closed securely.
1. Project Overview
- Skill level: Confident beginner
- Project type: Decorative crochet pillow
- Construction method: Two matching heart panels crocheted in rows and joined around the perimeter
- Crochet terminology: US terms
- Approximate finished size: 12 inches wide by 11 inches tall, depending on yarn, hook, and tension
- Approximate completion time: 4–7 hours
- Main techniques: Chain stitches, single crochet, increases, decreases, shaping curves, joining panels, and stuffing
Measurements and completion time are estimates. Your finished pillow may be larger or smaller depending on the materials you choose, your tension, and how firmly you stuff it.
2. Materials and Tools
- Medium-weight yarn suitable for home décor, approximately 150–250 yards for the sample
- A crochet hook suited to the yarn, often around 4.5–5.5 mm
- Polyester fiberfill or other suitable pillow stuffing
- Scissors
- Tapestry needle
- Measuring tape
- Stitch markers, especially for the bottom point and center cleft
A smooth, medium-weight yarn makes it easier to see your stitches and count them accurately. Cotton offers clear stitch definition and a firm finish, while acrylic yarn can create a soft, lightweight pillow. A suitable blend may combine softness and durability.
Choose a hook that creates a close, stable fabric so the stuffing does not show through the stitches. If the fabric is too loose, try a smaller hook; if it is too stiff to shape comfortably, try a larger hook.
Use yarn and stuffing appropriate for the pillow’s intended use and care requirements. This is a decorative pillow pattern, not a design intended for infant sleep.
3. US Crochet Abbreviations
| Abbreviation | Meaning |
|---|---|
| ch | Chain |
| sl st | Slip stitch |
| sc | Single crochet |
| st | Stitch |
| inc | Increase: work 2 sc in the same stitch |
| dec | Decrease: work 2 stitches together as 1 sc |
| rep | Repeat |
| FO | Fasten off |
How to increase and decrease
- Increase: Work 2 single crochet stitches into one stitch. This adds one stitch to the row and helps the panel grow wider.
- Decrease: Insert the hook into the next stitch and pull up a loop. Insert the hook into the following stitch and pull up a loop. Yarn over and pull through all loops on the hook. This combines two stitches into one and reduces the stitch count.
Turning chains
At the beginning of each row, ch 1 and turn. The turning chain does not count as a stitch. Work the first sc into the first actual stitch of the previous row.
4. Before You Begin
You should be comfortable making a slip knot, working a foundation chain, crocheting single crochet stitches, and counting stitches.
Use a stitch marker to identify the center of the bottom point while you work the lower rows. Later, mark the inner edge of each upper lobe so the center cleft stays centered.
Keep your tension consistent. If your stitches become tighter near the end of a row, the panel may curl or become narrower. Count every row before continuing, and leave a long yarn tail when fastening off a lobe that needs to be joined or sewn.
Construction method
Each heart panel is worked from the bottom point upward in rows of single crochet. The lower section gradually increases to form the wider body. At the top, the stitches are divided into two equal groups. Each group is worked separately to create one rounded lobe, with decreases shaping the outer curve and inner edge.
Make two identical panels, then join them with single crochet around the perimeter. Leave an opening for stuffing, fill the pillow, and finish the seam.
5. Step-by-Step Crochet Heart-Shaped Pillow Pattern
The sample heart is made from two matching panels using single crochet. The lower point begins with two stitches, and the panel gradually widens until it reaches 30 stitches. The stitches are then divided into two groups to form the upper lobes and the center cleft.
For a balanced shape, keep the increases at the beginning and end of each lower row. When shaping the lobes, follow the inner-edge and outer-edge instructions carefully so both sides mirror each other.
Part A: Create the Lower Point
Make the first panel with your chosen yarn and hook.
Row 1: Ch 2. Work 2 sc in the second ch from the hook. You have 2 sc.
Row 2: Ch 1 and turn. Work 2 sc in the first st, then 2 sc in the last st. You have 4 sc.
Row 3: Ch 1 and turn. Work 2 sc in the first st, sc in each stitch across until 1 st remains, then work 2 sc in the last st. You have 6 sc.
Continue increasing in the first and last stitches of every row. Work 2 sc in the first stitch, sc in each stitch across until 1 stitch remains, and 2 sc in the last stitch.
Follow this row-count guide:
| Row | Stitch count |
|---|---|
| 1 | 2 |
| 2 | 4 |
| 3 | 6 |
| 4 | 8 |
| 5 | 10 |
| 6 | 12 |
| 7 | 14 |
| 8 | 16 |
| 9 | 18 |
| 10 | 20 |
| 11 | 22 |
| 12 | 24 |
| 13 | 26 |
| 14 | 28 |
| 15 | 30 |
Place a stitch marker at the center of the starting point if helpful. The first row forms the bottom point, while the increases gradually widen the panel into the main body of the heart.
Do not count the turning chain as a stitch. Each row after Row 1 adds two stitches, one at each end.
Part B: Shape the Wider Middle
After Row 15, you have 30 sc. Work one additional row without increasing to create a short, stable upper body before dividing the stitches.
Row 16: Ch 1 and turn. Work 1 sc in each of the 30 stitches. You have 30 sc.
Lay the panel flat. The bottom point should be centered, and both sides should slope outward evenly. If one side looks steeper, check the stitch counts and make sure you increased at both ends of every lower row.
The upper edge now has 30 stitches. You will use the first 15 stitches for one lobe and the remaining 15 stitches for the other.
Part C: Form the First Upper Lobe
The first lobe is worked across the first 15 stitches of Row 16. The second lobe will be worked across the remaining 15 stitches.
Keep the right side facing you. Attach yarn at the outer edge of the first group of 15 stitches.
Lobe Row 1: Ch 1, sc in each of the first 15 stitches. You have 15 sc.
Lobe Row 2: Ch 1 and turn. Work a sc decrease over the first 2 stitches, then sc in each remaining stitch. You have 14 sc. This decrease shapes the inner edge beside the center cleft.
Lobe Row 3: Ch 1 and turn. Sc in each stitch across. You have 14 sc.
Lobe Row 4: Ch 1 and turn. Work a sc decrease over the first 2 stitches, then sc in each remaining stitch. You have 13 sc. This continues shaping the inner edge.
Lobe Row 5: Ch 1 and turn. Sc in each stitch across. You have 13 sc.
Lobe Row 6: Ch 1 and turn. Work a sc decrease over the first 2 stitches, then sc in each remaining stitch. You have 12 sc.
Lobe Row 7: Ch 1 and turn. Sc in each stitch across. You have 12 sc.
Lobe Row 8: Ch 1 and turn. Work a sc decrease over the first 2 stitches, then sc in each remaining stitch. You have 11 sc.
Lobe Row 9: Ch 1 and turn. Sc in each stitch across. You have 11 sc.
Lobe Row 10: Ch 1 and turn. Work a sc decrease over the first 2 stitches, then sc in each remaining stitch. You have 10 sc.
Lobe Row 11: Ch 1 and turn. Work a sc decrease over the first 2 stitches, sc across until 2 stitches remain, then work a sc decrease over the last 2 stitches. You have 8 sc.
Lobe Row 12: Ch 1 and turn. Sc in each stitch across. You have 8 sc.
Lobe Row 13: Ch 1 and turn. Work a sc decrease over the first 2 stitches, sc across until 2 stitches remain, then work a sc decrease over the last 2 stitches. You have 6 sc.
Lobe Row 14: Ch 1 and turn. Sc in each stitch across. You have 6 sc.
Lobe Row 15: Ch 1 and turn. Work a sc decrease over the first 2 stitches, sc in the next 2 stitches, then work a sc decrease over the last 2 stitches. You have 4 sc.
Lobe Row 16: Ch 1 and turn. Work a sc decrease over the first 2 stitches and another sc decrease over the last 2 stitches. You have 2 sc.
FO, leaving a long tail if you want to use it to secure the top edge. Weave in the remaining end on the wrong side.
The repeated decreases shape the lobe upward. The decreases along the inner edge help form the center cleft, while the later decreases across both ends narrow the top of the lobe.
Part D: Form the Second Upper Lobe
Lay the panel flat with the right side facing you. Find the 15 unworked stitches remaining along Row 16.
Attach yarn at the opposite outer edge of this group. Work the same 16 lobe rows, but reverse the shaping so the decreases mirror the first lobe.
For this second lobe:
- On Lobe Rows 2, 4, 6, 8, and 10, decrease at the inner edge next to the center cleft.
- On Lobe Rows 11, 13, 15, and 16, decrease at both ends as instructed for the first lobe.
- Work plain sc rows between decrease rows.
- Follow the same stitch counts as the first lobe.
Because the second lobe is worked in the opposite direction, its inner edge is at the other end of the row. Work the first decrease at the end nearest the center cleft for Rows 2, 4, 6, 8, and 10, rather than at the outer edge. This creates a mirrored shape.
FO and weave in the end. Mark the center cleft between the two lobes.
Part E: Finish the Heart Panel
Lay the completed panel flat and inspect its shape.
- The bottom point should sit in the center.
- Both sides should slope outward evenly.
- The two upper lobes should be similar in height and width.
- The center cleft should be clearly visible between the lobes.
- The upper edges should not be pulled tightly together.
The panel may need gentle blocking to even out the edges. Do not stretch it aggressively, as this can make the two panels difficult to match later.
Part F: Make the Second Panel
Repeat the entire pattern to make a second heart panel. Use the same yarn, hook, stitch counts, and shaping instructions.
Lay the panels on top of each other before joining. Align the pointed bottoms, outer curves, upper lobes, and center clefts. If one panel is larger, check your tension and gently reshape it before assembly. Avoid stretching one panel to fit the other.
6. Complete Written Heart Panel Summary
Make two identical panels using the following sequence:
- Row 1: Ch 2, 2 sc in second ch from hook — 2 sc.
- Row 2: Increase at both ends — 4 sc.
- Rows 3–15: Increase at both ends of every row — stitch counts rise by 2 each row, ending with 30 sc.
- Row 16: Sc across without increasing — 30 sc.
- First lobe, Rows 1–10: Begin with 15 sc; work alternating decrease and plain rows, ending Row 10 with 10 sc.
- First lobe, Rows 11–16: Decrease at both ends on Rows 11, 13, 15, and 16, with plain rows between where specified. Finish with 2 sc.
- Second lobe: Work the remaining 15 stitches using the same stitch counts and mirrored decrease placement.
- FO and weave in ends.
Make the second panel exactly the same way. Both panels should be the same size before joining.
7. Stitch Count and Shape Verification
Use these checks as you work:
- Each lower row adds exactly two stitches, one at each end.
- Row 15 has 30 stitches, and Row 16 still has 30 stitches.
- The upper edge is divided into two groups of 15 stitches.
- Each lobe begins with 15 stitches and follows the same sequence of stitch counts.
- The center cleft is formed by shaping the inner edges of the two lobes separately.
- Both panels use identical yarn, hook size, stitch counts, and tension.
- The panels should lie together without pulling, stretching, or gathering.
If a row has the wrong stitch count, undo it and correct it before continuing. Small count errors can shift the center cleft or make the bottom point look off-center.
8. Join the Two Heart Panels
Single crochet around the perimeter creates a sturdy, decorative edge. Before joining, place the two panels together with their right sides facing outward and their edges aligned.
Begin the seam
- Place a stitch marker at the bottom point and another at the center cleft.
- Join the yarn at one side of the heart, leaving a tail long enough to secure later.
- Insert the hook through the corresponding edge stitch of both panels.
- Yarn over and pull up a loop through both layers.
- Yarn over again and pull through both loops to complete one sc.
Continue working one sc through corresponding stitches along the two panels.
Follow the heart outline
- Along straight edges: Work one sc through each matching stitch.
- Along rounded upper lobes: Distribute stitches evenly along the row ends. Avoid inserting several stitches into one spot, which can make the edge flare.
- At the center cleft: Work slowly and secure the seam on both sides of the dip. Follow the actual outline rather than bridging across the opening.
- At the bottom point: Work carefully through the matching stitches at the tip. If the point puckers, use a slightly looser stitch rather than forcing extra stitches into the same location.
Continue around the edge until you reach the starting point. Leave an opening of approximately 3–4 inches along one side for stuffing.
Keep the joining stitches even, but do not pull them so tightly that the panels curl inward. If the edges do not align, stop and check that the panels are positioned correctly before continuing.
9. Stuff the Pillow
Add the stuffing gradually through the opening.
- Begin by placing small amounts of stuffing into the two upper lobes.
- Fill the wider side areas evenly.
- Add stuffing to the lower tapered section.
- Gently push small pieces into the bottom point using your fingers or the blunt end of a crochet hook.
- Pause frequently to shape the pillow and check its thickness.
Avoid stuffing the pillow too firmly. Overstuffing can stretch the stitches, make the seams bulge, and hide the center cleft. Too little stuffing can leave the heart flat and uneven.
Keep the two lobes rounded and similar in size. Add a little more stuffing to whichever side looks flatter, and smooth out any lumps before closing the opening.
10. Close the Opening and Finish
When the pillow has the desired fullness, continue the single-crochet seam through the remaining matching edge stitches.
- Align the edges of the opening.
- Work one sc through both layers for each pair of corresponding edge stitches.
- Check that the final stitches are secure and the seam remains even.
- Join to the first sc if appropriate, then FO.
- Use a tapestry needle to weave the yarn tail through several stitches on the inside of the seam.
- Trim the remaining yarn close to the fabric without cutting any crochet stitches.
Inspect the entire pillow for gaps, loose stitches, uneven seams, and lumpy stuffing. Gently reshape the upper lobes and bottom point with your hands.
If the center cleft becomes shallow after stuffing, press the dip inward gently and redistribute stuffing away from the middle of the two lobes.
11. Sizing and Customization
You can customize the pillow by changing its overall size, color, texture, and stuffing density.
Make the pillow larger or smaller
To make a larger pillow, use a thicker yarn and a suitable larger hook, or add more increase rows before dividing the panel into lobes. If you add rows, the upper edge will contain more stitches, so divide the new total evenly between the two lobes and revise their shaping counts accordingly.
To make a smaller pillow, use a finer yarn and smaller hook. Keep the heart outline balanced and ensure that the upper edge can still be divided evenly.
Changing only the hook size may affect fabric density as well as dimensions. Always make a sample panel before committing to a different yarn or hook.
Choose your colors
- Romantic: Use red, rose, pink, or cream.
- Playful: Combine bright colors or alternate colors between the two panels.
- Minimalist: Choose one neutral shade and a matching seam color.
- Textured: Use a yarn with subtle texture, provided you can still see your stitches clearly.
If you use a different color for each panel, remember that both sides will be visible. Weave in color-change ends securely before assembling the pillow.
Adjust the stuffing
Use less stuffing for a softer, flatter cushion and more for a plumper shape. Add stuffing gradually so you can maintain the heart’s outline without stretching the stitches.
12. Finishing and Care
Follow the care instructions for both your yarn and your chosen stuffing. Some finished pillows can be spot-cleaned, while others may need a removable cover or a carefully selected washable filling.
- Remove surface dust gently.
- Spot-clean small marks when the yarn care instructions permit.
- Avoid soaking the pillow unless the yarn, filling, and construction are suitable for washing.
- If washing is appropriate, support the pillow while wet and allow it to dry completely.
- Reshape the lobes, cleft, and bottom point after cleaning if needed.
Do not assume the entire pillow is machine washable simply because the yarn is washable. The filling and seams must also tolerate the chosen care method.
13. Troubleshooting
| Problem | Likely cause | Practical correction |
|---|---|---|
| The heart looks more like a circle | The lower section is too wide or the lobes are not defined enough | Check the increase rows and deepen the center cleft by adjusting the inner edges of the lobes. |
| The center cleft is too shallow | The inner edges do not dip far enough or the pillow is overstuffed | Redistribute stuffing away from the center and reshape the dip. Check that the lobes were worked separately. |
| One upper lobe is larger than the other | The lobe stitch counts or decrease placement differ | Compare the two lobes row by row and correct any mismatched decreases. |
| The bottom point is off-center | Increases were missed on one side or the first rows were worked unevenly | Check the lower-row counts and make sure each increase row adds one stitch at each end. |
| The sides become wavy | Too many stitches were added, or tension is inconsistent | Check the stitch counts and work with steadier tension. |
| The panels are different sizes | The yarn, hook, or tension changed between panels | Compare the panels before joining. Adjust tension or gently reshape them if the materials allow. |
| The seam gathers or stretches | Joining tension is too tight or too loose | Undo the affected section and work the seam with even tension. |
| The pillow looks lumpy after stuffing | Stuffing was added in large clumps or distributed unevenly | Remove some stuffing if necessary, then refill in small amounts and smooth it by hand. |
| The center cleft disappears when filled | Too much stuffing is packed into the upper middle | Remove a little stuffing and redistribute it into the lobes and sides. |
| Gaps appear along the seam | Stitches were skipped or the joining stitches are too loose | Repair the gaps with matching yarn, securing the stitches through both layers. |
14. Frequently Asked Questions
Is a crochet heart-shaped pillow suitable for beginners?
Yes, for someone comfortable with single crochet, increases, decreases, and working in rows. The upper lobes require careful shaping, so count each row and use stitch markers to keep the outline balanced.
Which yarn works best for a decorative pillow?
Medium-weight cotton, acrylic, or a suitable blend can work well. Choose a yarn with clear stitch definition and care requirements that suit the pillow’s intended use.
How do I make the two heart panels the same size?
Use the same yarn and hook, follow the same row counts, and keep your tension consistent. Lay the panels together before joining to check that the edges match.
How can I make the heart larger?
Use a thicker yarn and appropriate hook, or add increase rows before dividing the upper edge into lobes. If you change the stitch count, revise the lobe shaping so both sides remain symmetrical.
How do I keep the upper lobes symmetrical?
Use the same stitch counts and decrease sequence for both lobes, reversing the decrease placement where needed. Compare the lobes as you work rather than waiting until the panel is finished.
How much stuffing should I use?
Use enough to make the pillow soft and rounded without stretching the stitches. Add it gradually, distributing it evenly between the lobes, sides, and lower point.
How do I preserve the center cleft?
Shape both lobes separately, then distribute the stuffing away from the middle dip. Avoid overfilling the top of the pillow.
Which joining method gives a neat edge?
Single crochet through both panels creates a sturdy, defined border. Use consistent tension and insert the hook through corresponding edge stitches. A sewn seam is another option if you prefer a less prominent join.
Can I use leftover yarn?
Yes, as long as the yarns have compatible weights and care requirements. Different yarn types can behave differently, so make a sample and check the fabric before using several yarns together.
How should I wash or clean the finished pillow?
Follow the care instructions for both the yarn and the stuffing. Spot-clean when appropriate, and wash the entire pillow only if its materials and construction support that method.
15. Conclusion
A handmade crochet heart-shaped pillow is a charming decorative project that can be personalized with different colors, textures, and sizes. Take your time with the stitch counts, make both panels to matching dimensions, and shape the upper lobes carefully to create a recognizable heart.
Stuff the pillow gradually, keep the center cleft visible, and check the seams before closing the final opening. With careful shaping and finishing, you can create a soft, welcoming heart pillow for your home or as a handmade gift.
Leave a Comment